Sunday, May 26, 2019

Part 2 - Metal plate drypoint - reusing a failed polymer plate

detail from print before hand-colouring application.

this is the second part of a two part post.

A smaller plate was cut from the piece of larger plate I had salvaged in the previous post. A sketch on paper was created that was sized to the plate dimensions of 5 x 8.25 cm (2 x 3.25 in). 

One side of the stainless steel plate was then coated in black using a Sharpie permanent chisel tip marker. When it dried I taped a piece of Saral white transfer paper over top of the plate. A scan had been made from the drawing and it was printed in reverse on a piece of paper using an inkjet printer. I cut the paper leaving a .5 inch beyond the drawing edge so I could tuck and secure it with green masking tape to the underside of the plate. Using a 2H pencil I followed the main lines of my sketch and this transferred the image in white line onto the marker coated plate.


I found that a diamond tip drypoint needle gave the best results for working on a stainless steel surface (due to the hardness of the metal). With metal you will get a deposit of small metal along both sides of the scratched line (this is known as the "burr".) It will create a bit of a fuzzy like quality when ink is wiped onto the plate and printed. As this was a small image a swing-arm magnification lamp was used and with the needle I worked into the plate surface using drawing like movements (like those used when drawing with pen & ink.)
The black marker was then removed by wiping a bit of pure acetone on an old piece of rag over the plate surface.


Then I wiped a some etching ink into the lines to reveal the work better against the shiny metal. I then set a scrap of cotton rag (soaked + blotted) over top, put the paper and plate on the press bed and made a test proof by passing all under the blankets and beneath the roller of an etching press.


The proof revealed that more depth would be required in some areas to produce darker lines.


Lines were deepened with the diamond tip and some more minor details were added.


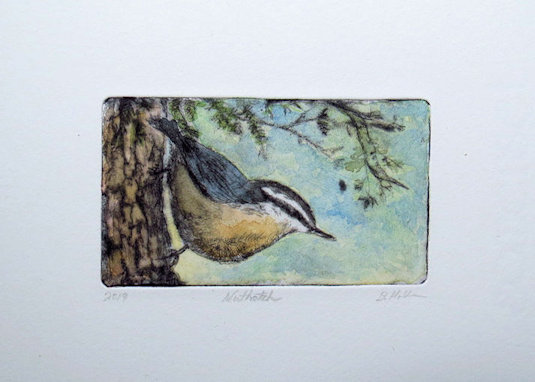
Once I felt that the surface was ready I re-inked the plate with oil based etching ink and put a piece of  soaked & blotted Magnani 250 gm rag over top then through the press.


After the ink dried I applied colour into the print with washes of diluted acrylic inks.


Part 1 - Metal plate drypoint - reusing a failed polymer plate


Nuthatch
metal plate drypoint with hand-colouring


Recently I did a bit of re-organizing of some boxes of items for use in my print studio. One item that I came across was a small box of printing plates (polymer coated) that had failed either during exposure of artwork onto the surface or the image did not wash out successfully during developing of plates in water. I had decided at the times when failure occurred to hold on to the plates and see if I could salvage them for another use.


During the process of cleaning off some old ink I noticed that rinsing the plate in hot water caused the hardened polymer on the plate surface to soften. I wondered if it might be possible to remove the polymer altogether so made it a mission to figure out how this might be achieved.

I thought perhaps applying heat with a hair dryer might work, and unfortunately it didn't provide the heat required.  I also didn't have an electric paint stripping gun which might have produced the temperature to soften the coating. 

As hot water had worked initially I decided why not immerse the plate into boiling hot water and let it sit for a few minutes. 


I thought maybe the polymer might remove easily with a fine steel wool. Instead it lifted off a gummy mess which fused into the steel wool bundle as the temperature of the coating cooled.

What did appear to work was scraping off the coating with a thin steel scraper tool that I use for removal of paint off windows.
However when the plate was removed from the boiling water I only had less than five minutes before the polymer would start to re-harden making it difficult to scrape and release off the plate. What I had to do was re-immerse the plate into boiling water and then continue.  The good news is this method worked and I successfully stripped all the coating from the thin stainless steel plate surface.


After scraping all the coating off I took some fine grade sandpaper and gave the surface a sanding using first up and down strokes with the paper then rotating the plate sideways and going across the metal at 90 degrees. I followed this with extra fine sanding sponge (same direction) and then a wipe with a clean rag.


Next post you can read about and view photos of a small new work that began as a drawing onto the metal and then worked into using a drypoint needle.