Saturday, December 2, 2023

New magnification lamp and a couple new prints


the work table where I engrave with tools & new magnification lamp 


I recently treated myself to an early Christmas present after doing some online research for a new portable magnification lamp after the older unit I had been using stop working.

Came across this model (attached to my engraving work table in the above photo) in online retailer Amazon 

It met all the criteria I was seeking (those being a minimum 10X magnification, good price point, portability, LED lamp (this one offered 5 types of light settings and these could be dimmed or the brightness intensified depending on the need). It also included free shipping which was a plus. The unit came with an adapter to plug into a conventional wall plug and could also be connected directly into a computer or other USB port to power it.

What a treat it is to work now with 10x magnification through the lens. The older lamp magnifier was only 5X. 

The small engraved wood relief print shown below was created using the new lamp to engrave a block from a drawing that I adapted to a small piece of boxwood end-grain. 


"Kindness"
relief print from engraved wood block


sketch using fine point marker pen


tracing on vellum (reverse orientation) & image transfer to block surface 


block, leather sandbag and engraving tools


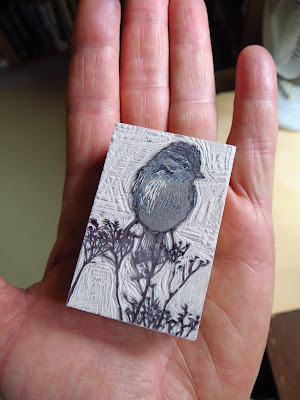
this photo shows the block size compared
to the size of the palm of my hand


print on paper, block on registration sheet on my press bed.
The white bars (laminated mdf cut offs) are used as runners
that help balance the top roller during printing.
These are very close in height to the boxwood block


Both prints reflect the theme of winter. The first of the two new print images I made (see below) was a linocut. It is a study based on an afternoon of snowshoeing that I participated in several seasons back. Both prints were printed onto Somerset velvet warm white 250 gm rag paper. I used Cranfield safewash black relief printing ink and both images were printed using an etching press roller. 
A special registration set up was made on the press bed that allowed me to use the press usually delegated for intaglio processes but to print both relief based surfaces.


Winter trail
linocut 


both images are available for purchase through my Etsy shop


Monday, October 2, 2023

continuation with relief based engraving


Wild Blueberries
hand-coloured resingrave relief print


During the summer I had some opportunities to continue adapting some of my small sketches onto both real end-grain wood surface (maple) and some older blocks of synthetic resingrave. 

Wild blueberries was based on my experiences in my region of the world where the mid to late summer these plants native to this region produce a lot of berries that the local fauna and many humans feast on. I also wanted to develop my skills with the engraving tools to create texture, lines and shapes in the composition that would be interesting and have a visual impact.

pencil sketch made on surface of a 6 x 9 cm (2.4 x 3.5 inches) rectangular resingrave block


permanent black marker traced over top of the pencil marks


inked rolled onto block surface to reveal progress while engraving


further engraving progress 


final proof in black oil based relief printing ink made onto 250 gsm white cotton rag paper


I also created three more engravings using 1.27 (1/2 inch) thick maple end-grain blocks that were gifted to me by a master engraver friend.
Two of these became exclusive hand-printed cards for my parents as a gift from me to them in honour of their 65th wedding anniversary. I printed and hand-coloured 10 of each design. The blueberries theme was repeated in a smaller print. I also used a rural landscape sketch made during a previous visit to the region where they reside. The blueberries would remind them of an earlier time in their lives when they met in this region and as a child was an annual tradition to head outdoors in August to pick berries for pies from nearby wilderness locales. 

pencil sketch on maple end-grain. I shaved back the top and right side edge to square the image.


dusting baby powder onto the surface to reveal engraving markings


black oil ink proof on paper


hand-coloured print 


Wellington County hand-coloured engraving 


engraved block progress proof


Dogwood
engraving with hand colouring

Wednesday, June 28, 2023

Completing an engraving started in 2009


View
single colour engraving (from resingrave block)
image size: 4.5 x 6 cm (1 5/8 x 2 3/8 in)

 I was recently organizing some of my artist materials to a more centralized storage system and happened upon a small sized block of resingrave (synthetic coating that is fused in a thin layer to a mdf substrate that makes it type set height). On the surface of the block was a sketch I had made of a sparrow balanced on top of several wildflower branch heads. The block itself measures 4.5 x 6 cm.


At the time I had only progressed to the rough sketch and decided this might be too small for an image to continue. But as fate would have it other things soon took priority and the block was set aside and then put into storage. Last week I was going to begin another new work but when I discovered the block I decided to focus instead on it. I had since that time acquired a good full spectrum combo lamp-5X magnification swing arm unit that allows me to work on blocks that would become small detail engravings.


In the above photo the sketch was traced over using a waterproof fine liner marker. The top area surrounding the bird (sparrow) has been cut away using several engraving blades.


The block is set on a leather sand bag while engraving which allows me to turn both it and block and raises it to a good visible working height under my magnification lamp.. 


block with background cleared
and the early stages of adding details 

print from the open edition with addition
of wash & pigment using a small paint brush


I will print this as an open edition. Some of these will also find a little colour added to them


Sunday, June 11, 2023

Engraving from end-grain maple block


Coastline- Lake Superior
wood engraving/hand-coloured
open editon (varied)
2023


Recently a fellow printmaker (master engraver) who is a good friend I have known for at least 25 yrs sent me with a couple of pieces of end-grain wood he wasn't planning on using. To date I had only engraved into Resingrave (a synthetic hard polymer) and old hard dark brown linoleum. 

I had been wanting to try end-grain but encountered difficulty in sourcing it here in Canada. I was forced to put that earlier idea into the "do that later" mental files. 

My printmaking friend had seen some recent small lino and resingrave work I showed him via email and he decided to help me obtain some traditional end-grain hardwood that he has used throughout his career as wood engraver, artist/illustrator and run a small gallery to showcase his work in his residence. In addition to the section of maple I was also sent an equal size piece of rare old boxwood. 


I had the wood pieces cut to specific smaller size blocks by a local cabinet maker who had the recommended vertical bandsaw to cut with the grain (which is vertical orientation for the almost 3/4" thick blocks. The maple block I was sent is around 1/2" in height.

I was fortunate to have a small tabletop Blick etching press that allows enough clearance between the press bed and bottom of the top roller set at it's max height to accommodate paper and a smooth piece of hard paperboard. 

I chose a landscape to sketch from a photo I had taken a couple of years back taken during a trip east to visit family. This is typical cambrian shield rocky outcrop that borders the north shore of Lake Superior on the Canadian side of the border, One will often find low bush blueberry shrubs, harebell flowers growing out of cracks in the rock. The rock also has a lot of lichens spreading across the ancient granite face. It is one of my favourite things about living here in the region where I do.

Below are a few photos that illustrate the creation of the print. They show a bit of the progression from after I had carved the block surface and through to the final colour version on paper. The first photo is my working set up and I place most of the tools nearby as well as the leather sandbag to help me keep the block stable while it is engraved. I also use a crocker sharpener system with light mineral oil and an arkansas oil stone to keep the tool tips nice and sharp. I will give a particular tool I plan to use a quick pass back and forth across the oil stone and it makes cutting into the wood surface less difficult to cut.

For the hand-colour element again I introduced watercolour with small fine tip watercolour brushes.


Friday, April 28, 2023

Chickadee - relief block engraving (hand-coloured)


Continuing the addition to my small songbirds of the boreal forest series of engraved surfaces that began with a small study of a red-breasted nuthatch click here I have a new work to share.

This time it's a black-capped chickadee.

This particular study like the former print again echoes the bird placement among tree foliage and the inclusion of hand colouring after drying of oil relief ink on paper (printed from the block). 

 The chickadee print is slightly wider but the same height compared to the nuthatch in block size. It is 6.25 x 9 cm (2.5 x 3.5 inches). To date I have printed 10 good images on heavier italian milled cotton rag paper. It will be an open edition so I can print more as needed off the block.

I won't go into written detail about process with a lot of words since it has been described several times in earlier posts found by using the search word engraving. Instead I will show photos of stages of creation that visually describe the process I use.


tracing from a basic soft lead pencil sketch and transfer to block surface


pencil sketch then had black permanent marker over top


a wash of thinned india ink was put over the marker image 
photo shows early stages of engraving using a scorper blade (top) and a spitsticker blade (side). After this photo I decided to cut incidental marks to create foliage


a progress proof on japanese paper


marker pigment removed using acetone


inked block on the press bed with runner bars on either side that paper will set on top


block surface inked and ready to print


adding watercolour wash during hand-colour stage


the final result


nuthatch and chickadee engravings on paper


I was recently gifted some damaged wood pieces by a fellow engraver (boxwood and maple) that I had cut by a local cabinet maker using a bandsaw to yield me a range of smaller blocks that were usable. I just hand sand the block edges to square them since the end-grain is delicate and requires special care for cutting into blocks from larger pieces.


Saturday, April 1, 2023

small two block landscape linocut with additional colour applied by hand


Last week I took a couple of small pieces of battleship gray linoleum that were left over from a past project and used these to create a small colour landscape relief print. 

Referencing a couple of source photographs I had taken during a river walk a couple years ago I made a sketch on paper (first photo below). This was transferred onto tracing paper and reduced to a silhouette (second photo). I traced the silhouette image in reverse by flipping the tracing over top of graphite paper positioned onto the piece of lino that would become the key block. Then I darkened the pencil by drawing with waterproof sharpie marker over the pencil silhouette. Detailing in the foreground and some indications of forms that light would define (shoreline, path and long grass and indication of flowering plants) were brought out by drawing these on the solid black using a white pencil crayon and fine tip white ink gelli pen.  


The size of the linoleum blocks determined what could be achieved in carving within the dimensions of 2.75 x 3.5 inches. Some of the fine details were only achievable by using magnification and use of a palm grip micro cutter and a couple of wood engraving blades during the carving process.


When carving was complete I rolled oil based black relief printing ink across the surface, set the block on the press bed and put a piece of inexpensive subi paper over top. A thin piece of smooth masonite panel was set over top the paper. But before advancing the press bed to pass under the roller I adjusted the gauge posts raise the roller to accommodate the block, paper and masonite based on the overall height of all elements stacked on one another and deliver a gentle pressure to make a proof print on paper. 


After several days of letting the proof dry I put tracing paper over it and sketched in shapes of clouds I thought would add interest in the background sky. I decided to also allow for minor reflection of clouds in the water (mirror effect). Again, I traced the sketch in reverse onto the second block, used permanent marker over the pencil lines and carved away the surface linoleum outside of the black shapes (clouds and area in the water below the horizon line).    

I then mixed a blue hue from oil based relief printing ink. This was printed onto another sheet of subi. When the ink had developed a skin after 24 hours (I added a small dot of a drying medium to the ink) I  placed the key block (inked and ready to print) in place, put the proof on the pins and set it over the block (printed blue ink side face down) and ran it through the press. This allowed me to see if the registration was good and how the black and blue worked together.


It was at this point I remembered using a gradient ink blend on my brayer to create a dramatic sky effect in an earlier print project and I decided to see how it would work for this study. This involved placing dabs of ink on my glass ink rolling surface (darker blue on top, white in the middle and blue ink again below this). The brayer was rolled several times so that the inks mixed into one another at their edge points and created a gradation effect that was rolled onto the second block. (I set some scrap pieces of equal height lino on either side of the block to start and end my ink rolls when it was transferred to the block surface and this delivered a pretty consistant effect).


I could have continued cutting more blocks to introduce other colours to the foreground grasses, path and left side foliage but since this was a rather small print size I decided at this point there would be less stress if additional colour was applied using brush and wet media pigments to these small areas of negative space.