Thursday, December 9, 2021

A small relief block print bird study

Nuthatch
relief block engraving w/ hand colour
printed image size: 5.5 x 8.25 cm


While still "in the creative moment" from the previous post linocut endeavor I took another sketch of a nuthatch and decided to adapt it onto a small scrap piece of hard linoleum. 

Due to the small size of the work and to help put less pressure on my neck I again used a illuminated swing-arm magnification lamp and a small portable table-top raised surface to cut the block on while I was sitting.


 permanent black marker drawn over pencil
& cutting of surface areas underway

carved block ready to be printed
ink was rolled across the surface with a small hard brayer


The block size measures 2 1/8 x 3 1/4 inches, I found working with magnification really helped me see the cutting up close. It isn't until the relief surface is inked and the first progress proof is made that you get a sense of how small the line is in this.

I used a couple of blades to achieve the design. The first was a small u gauge liner blade which was used mainly for cutting and clearing away larger areas found in the bird and also in a couple of branches. To get the really fine line of the needles, lines in the feathers on the nuthatch I used a lozenge graver wood engraving tool. 
Additionally, I found it better to have the linoleum cold and hard surface for cutting using the wood engraving tool.

When I had the block ready I rolled thinned oil base relief printing ink (in this case some older tube Daniel Smith relief carbon black). 
I used my homemade registration board system with a 3 hole punch attached at the top to hold the paper, an L shaped mat board corner to hold the block in place and centered with the paper. I also had strip runners of 3/8 inch wide scrap lino glued to the sides of the registration board that would help keep the roller level and that the pressure was evenly distributed across the surface when the works are passed under it. Once the paper is attached to the board using the punch pins at top I set a piece of smooth masonite over top and carefully pass the works under the roller by turning the manual press levers.

I printed the first couple of inked block impressions on newsprint to help in adjusting the pressure of the roller, then a couple were made onto thin white kozo.
A small number were then printed onto Magnani and Somerset rag. Several were printed on 5 x7 inch card size rag (Arches) as I saw the opportunity to use these as my seasonal card for several close family and friends.

I allowed several days for the ink to dry by hanging the prints in a warm ventilated room. 


A small amount of colour was introduced to the prints using fine artist grade watercolour paint with small sable brush.


It has been great to get back into relief printing and the processes involved.

Some of these will soon be listed as available in my Etsy shop found under my shop name Borealart. (link below) 


Friday, November 19, 2021

Return to relief block printmaking


sketch was transferred to the block with graphite paper then permanent marker was drawn over the lines on the grey battleship linoleum. This was used as my cutting guide.


My apologies to those who are following this blog and the sparse number of posts published this year. Health issues have been the reason.

The good news is I am feeling a lot better and my physical abilities have been making improvement thanks to results from tests and medical advice. 

Recently I decided to take a sketch on paper, transfer it to the surface of a small piece of battleship grey linoleum and then carve a relief design. 

It has been at least 6 years since I last made a relief print on paper and really missed the process.


graphite sketch main shapes made on parchment
then transferred to block surface with graphite paper


the model


During my recovery I would often sit outside in the sun and in a quiet wooded yard. There are a variety of birds that visit me. I am especially taken with the very friendly red-breasted nuthatch family that are treated with a little loose seeds or peanuts.

I thought it might be fitting to adapt a sketch from one of the observations to a block surface. It has progressed to carving of the negative surface areas. I have to decide whether to do this as a single block in black and white or visualize and carve additional plates to allow colour elements to be added the design. Or I could introduce colour via hand-colouring with water-based media into the single black and white image

Below are a few photos that show some of the early stages of developing the matrix from which the print will hopefully emerge on paper.


A side note: I used a wood engraving tool (known as a lozenge graver) to achieve small fine lines to define feather patterns in the wing. This worked well as long as the linoleum was cold and hard surfaced. For removal of wider size surface areas using traditional linocut tools I will generally heat the block first. The lino surface material is much easier to remove when it is warm.


fine lines removed on surface for wing definition 

lozenge graver (wood engraving tool) that was used for
the fine surface line removal in the wing area
 

progress print on scrap kozo paper using water-based block printing ink
transferred using a hard plastic rubbing tool


Monday, March 1, 2021

more dry point from acrylic plate

Kayak on shore, drypoint 2021 


Recently a friend of mine and I were talking about kayaking. 

Our conversation led me to reminisce about a few outings I had made in a kayak not so long ago. I remembered there were a few photos taken during my excursions that had been kept on file. I thought maybe it was time to incorporate the subject into some type of art work. I made a quick sketch while looking at one photo of the kayak I had been using at that time. I also looked at a few landscapes and waterway photos.


rough sketch in pencil


I had a small piece of 2mm thick clear acrylic plate (framing plexiglass) and decided to take the sketch and configure it to create a small dry point study on the surface of that plate. To achieve this I first scanned the original sketch and with the graphics editing program I use (Corel draw) resized this to fit the dimensions of the plate (2.75 x 4 inch rectangle).

On the reduction size inkjet print out of the sketch I then added more elements in pencil that would define more trees, rocks and such. The plate was set over top of the sketch and taped in place (with tabs of clear cellophane in the corners to anchor it to my drawing board). I set this underneath a lit magnification swing-arm lamp and started working the surface (with the sketch underneath as my guide). I used a variety of sharp tip needle tools to achieve this. 


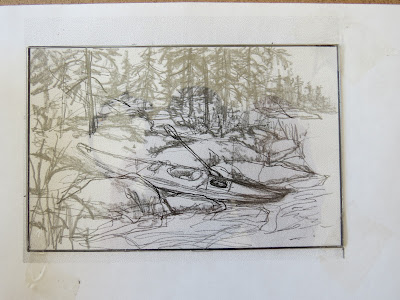
clear acrylic plate set over top of inkjet reduction print
that has more details added in pencil


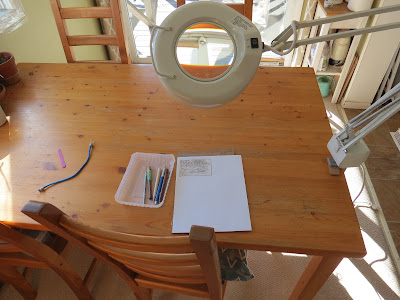
the area and table where I do my preliminary work before printing 


tools for drypoint - one is repurposed (the retractable
mechanical pencil lead holder with compass needle point).
The light wood dowel contains a darning needle
(countersunk in a small drilled hole in the end.)


detail of scratch into the surface of the plate


The composition was altered with a needle instead of a pencil and on a plastic surface instead of paper. I added fine dot by creating areas of stiple marks in the surface using fast repeated pocking with the mechanical pencil anchored needle tip.

The plate edge was then beveled to a 45 degree angle with a shop file and the corners of the plate were also slightly rounded.

I applied Cranfield Safewash carbon black ink with a rolled felt dabber and wiped this back with a softer web type fabric (instead of tartalan cloth which would have left fine surface scratch marks in the acrylic. I immersed a few pieces of 250 gm cotton rag into water then blotted them with cotton towels and set them between newsprint.


plate reversed (inked side on the bottom of plate)
after first proof pulled on paper with press


first proof - notice how the ink prints darker tone in areas 
around shoreline rocks and in the trees due to the burr from
the plate surface.


the third print from the plate. Less contrast and gentler wiping
reveals more of the line and dot work.


Tuesday, February 16, 2021

recent activity re: printmaking endeavors


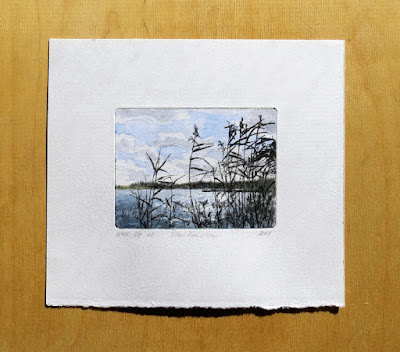
View from shore
2021
drypoint with hand color


Redpoll
2021
drypoint with hand color


Recently I decided to create a couple of small studies that combined intaglio with painting. The drypoint studies were drawn into the surface of thin acrylic (recycled product packaging that can cut into small pieces. Think of the cartons that have cards, food items contained in). The plates have a short life span when they are printed using high pressure of a press roller and only yield around 8 good prints off each plate. I decided to incorporate hand colouring to each one making it unique from the one before or after in the edition. I am finding printing small editions works for me in that less time is required in studio and these are not to strenuous on my body.

The first study is of a hoary redpoll perched on top of a fir tree. These small members of the finch family are common in this region over the cold winter months when they make their way down here from areas closer to the arctic. They have a noticeable red triangle that extends up to the top of their head that starts above the bill.  

The second study is a landscape based on a favourite lake I visit when I can. It is a late summer depiction of a view through reeds along shore looking across a section of the lake. 

Plate size for Redpoll measures 5 x 7.5 cm (2 x 3 inches). The image was drawn into the surface using a homemade needle (small sharp pointed compass needle held in place by the clamping mechanism of a mechanical pencil).  I have had that pencil since my college days over 40 yrs back. 


I used Cranfield safewash carbon black etching ink to wipe into the lines on the plate. Plates were printed onto Magnani 250 gm cotton rag. Once the ink had dried I introduced colour using liquid acrylic inks thinned with water.


plate with needle drawn image in surface 


For this recent landscape (below) again I have used thin acrylic plate. The plate size measures 8 x 11 cm (3 1/8 x 4 1/4 in). 


image/plate size for Redpoll measures 5 x 7.5 cm (2 x 3 in)


Friday, January 15, 2021

return from a lengthy absence to printing

For those who have noticed a long absence from this blog I have been battling a chronic disease for the past two years. The result was being forced to stop printmaking endeavours to focus on my health and recovery. 

One of the ways that helped me to cope with my situation was to re-focus my creative exploits and spend time painting (a lower impact activity that also allowed me to sit). Although I have enjoyed doing watercolour and I acrylic studies I realized recently how much that I really missed printmaking. So I decided to go into the studio and see what might be achieved.

Even though the disease still very much presents daily challenges I have discovered ways to alleviate some of the discomfort of standing and using my limbs in activities that require repeated exertions of strength, something which had been difficult to do. The secret was scheduling activity shorter in overall duration than what I usually was used to. For example, where I would spend several hours in one go in my studio, I now take a break after an hour or as my body tells me. I might then return later and spend another hour or two before calling it a day.

Yesterday I was feeling somewhat energetic and ended up spending some time in the studio mixing ink, applying it to the brayer and then onto an older carved linoleum block. This was used on the second block of a two-colour print titled Moon & Forest (an open edition) that I carved and printed in 2011. 

https://myprintmakingjourney.blogspot.com/2011/03/moon-influence-reprint-of-old-block.html


I used a couple of processes for the background colour block. The first was carving into the linoleum then carefully cutting it to remove as a small piece that required inking separatel. The second method was fountain blending of the ink using phthalo blue and white (blended by rolling the brayer repeatedly until the two inks mixed in a even transition). On the press bed I re-inserted the inked small circular piece into the circular hole.  The paper was set over top (paper secured to a homemade registration pin system) and I passed it under the preset roller to transfer it to paper. I was able to lay down the first colour layer onto nine separate pieces of rag. 


Today I am taking a day of rest. It is my hope that tomorrow I will feel well enough to return back into the studio to ink the key block and print this onto the nine prints in progress currently hanging to dry on the line in the warm basement studio.


In the meantime I have been looking at some older sketches and have developed some ideas for a brand new relief print. I have missed the feeling of carving into a surface and feel I can accomplish this again adapting to a reduce pace with frequent rest breaks. But my motivation factor is high and such good therapy too with the benefit of a little bit of physical exercise I get from doing this.