Showing posts with label art from recycled materials. Show all posts

Friday, February 2, 2024

tetra-pak for drypoint printmaking

Larger size coffee tetra-pak container 


I have accumulated a good collection of newer tetra-pak coffee containers over the past couple of years. Although I am not a coffee drinker myself my better half consumes several cups of the brew daily and favours a particular brand that is packaged in these large containers. 

I discovered a larger container on the market being used by some supermarket chains to replace plastic or metal coffee tins. These are an ideal source for tetra-pak plates that can give you a slightly larger area than those cut from the containers that are used for liquids.

I figured out a way to dissect the containers after the ground coffee was exhausted so decided to post a photo image tutorial of the process I use to create a range of plate sizes from the foil and paperboard interior surface. It can be a bit tricky as the container has rounded continuous corners. But I was able to dissect the packaging using some simple logic and careful steady cutting.

Tip: do your cutting on a surface that isn't going to be an issue if cut marks show up in it. I used a self-healing cutting mat.


The photos are in sequence and illustrate how to cut plates from this type of container.

1. Using a sharp retractable knife or scissors cut away the pull lid that is attached on the left side. This doesn't have the foil liner for this so you can either use it for other artistic purposes or put into recycle bin. 


2. unfold the curled in edge on the bottom of the container.  


3. Carefully cut and remove the bottom piece (that is lined with foil on the underside). 

This can be used for a small square print plate.


4. cut along the seam on the side of the container


5. Now for the tricky part. This requires a bit of patience and skillful cutting.

Don't apply too much pressure while pushing down on the container as you don't want to inflict creasing into the sections you are intending to use. I cut a section at a time and set each one aside until the entire container has been dissected.


6. Once you have all the sections cut away you can focus on trimming away the pieces where the lid on top and bottom were joined to the container body.


7. I chose to square off all the edges. The single container yielded 2 larger plates, one mid size and a smaller square and 2 narrower rectangular pieces. The largest plate measures 12.5 x 16 cm.


Here are two test prints I made off a couple of the tetra-pak plates. I used an etching needle on both. Akua prussian blue intaglio ink was wiped back on the horizontal plate shown on top in the photo below. The other plate I trimmed the edges in spots to give it more of a free form. Akua pthalo blue and green were wiped into the surface then both plates were printed using an etching press onto Magnani 250 gsm dampened cotton rag paper.


Tuesday, March 14, 2023

more tetra pak printing


An example of recent studio experimentations using tetra pak as a plate surface. The study originates from a sketch made after a visit to a local botanical conservatory. The bird of paradise blossom was in full bloom and made a good subject to interpret using a print based medium. In this case I chose a small tetra pak surface to use as a plate to transfer my sketch onto and scribe line into the surface and print onto paper using an intaglio technique.

I traced the main shapes from my sketch onto thin transparent tracing paper using a soft 6B pencil. The tracing paper was flipped over and aligned over the surface of the tetra pack panel (thin plastic coated foil fused to the paper fiber base). I went over the lines I could see through the paper using a hard but sharp pointed tip HB pencil and this left the impression of the 6B tracing but in reverse. Then with the use of an etching needle and cross hatching I was able to add in more tonal variation with cross hatch and stipple. 


Oil based Cranfield Safewash etching ink was wiped onto the plate surface and down into the scribed lines using a dabber made from tightly rolled up craft felt held together with a piece of duct tape. I wiped the ink with a soft porous fabric (not tartalan as it would be coarse and left scratch marks in the surface that would show with ink). I polished the plate surface with thin newsprint. 

I lightly misted & blotted a piece of  250 gm all media cotton rag paper that was then placed over the upward facing inked plate set on the press bed. A piece of newsprint was set over top of the print paper (protects blankets but helps absorb any moisture, then blankets were carefully set over top of this. I then passed all of this under the roller of my table top etching press.


The print was carefully removed and taped down onto a piece of mdf board to dry. Later I added washes of watercolour into the white regions to colourize the image. The plate and printed image size is small (7 cm x 8 cm). I was able to yield a total of 5 good images from the plate before it deteriorated to a point that the line was very faint.


Sunday, May 26, 2019

Part 2 - Metal plate drypoint - reusing a failed polymer plate

detail from print before hand-colouring application.

this is the second part of a two part post.

A smaller plate was cut from the piece of larger plate I had salvaged in the previous post. A sketch on paper was created that was sized to the plate dimensions of 5 x 8.25 cm (2 x 3.25 in). 

One side of the stainless steel plate was then coated in black using a Sharpie permanent chisel tip marker. When it dried I taped a piece of Saral white transfer paper over top of the plate. A scan had been made from the drawing and it was printed in reverse on a piece of paper using an inkjet printer. I cut the paper leaving a .5 inch beyond the drawing edge so I could tuck and secure it with green masking tape to the underside of the plate. Using a 2H pencil I followed the main lines of my sketch and this transferred the image in white line onto the marker coated plate.


I found that a diamond tip drypoint needle gave the best results for working on a stainless steel surface (due to the hardness of the metal). With metal you will get a deposit of small metal along both sides of the scratched line (this is known as the "burr".) It will create a bit of a fuzzy like quality when ink is wiped onto the plate and printed. As this was a small image a swing-arm magnification lamp was used and with the needle I worked into the plate surface using drawing like movements (like those used when drawing with pen & ink.)
The black marker was then removed by wiping a bit of pure acetone on an old piece of rag over the plate surface.


Then I wiped a some etching ink into the lines to reveal the work better against the shiny metal. I then set a scrap of cotton rag (soaked + blotted) over top, put the paper and plate on the press bed and made a test proof by passing all under the blankets and beneath the roller of an etching press.


The proof revealed that more depth would be required in some areas to produce darker lines.


Lines were deepened with the diamond tip and some more minor details were added.


Once I felt that the surface was ready I re-inked the plate with oil based etching ink and put a piece of  soaked & blotted Magnani 250 gm rag over top then through the press.


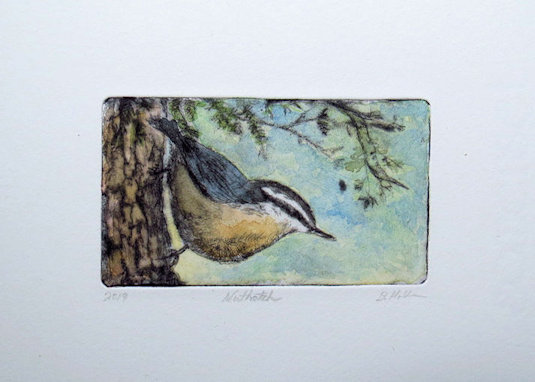
After the ink dried I applied colour into the print with washes of diluted acrylic inks.


Part 1 - Metal plate drypoint - reusing a failed polymer plate


Nuthatch
metal plate drypoint with hand-colouring


Recently I did a bit of re-organizing of some boxes of items for use in my print studio. One item that I came across was a small box of printing plates (polymer coated) that had failed either during exposure of artwork onto the surface or the image did not wash out successfully during developing of plates in water. I had decided at the times when failure occurred to hold on to the plates and see if I could salvage them for another use.


During the process of cleaning off some old ink I noticed that rinsing the plate in hot water caused the hardened polymer on the plate surface to soften. I wondered if it might be possible to remove the polymer altogether so made it a mission to figure out how this might be achieved.

I thought perhaps applying heat with a hair dryer might work, and unfortunately it didn't provide the heat required.  I also didn't have an electric paint stripping gun which might have produced the temperature to soften the coating. 

As hot water had worked initially I decided why not immerse the plate into boiling hot water and let it sit for a few minutes. 


I thought maybe the polymer might remove easily with a fine steel wool. Instead it lifted off a gummy mess which fused into the steel wool bundle as the temperature of the coating cooled.

What did appear to work was scraping off the coating with a thin steel scraper tool that I use for removal of paint off windows.
However when the plate was removed from the boiling water I only had less than five minutes before the polymer would start to re-harden making it difficult to scrape and release off the plate. What I had to do was re-immerse the plate into boiling water and then continue.  The good news is this method worked and I successfully stripped all the coating from the thin stainless steel plate surface.


After scraping all the coating off I took some fine grade sandpaper and gave the surface a sanding using first up and down strokes with the paper then rotating the plate sideways and going across the metal at 90 degrees. I followed this with extra fine sanding sponge (same direction) and then a wipe with a clean rag.


Next post you can read about and view photos of a small new work that began as a drawing onto the metal and then worked into using a drypoint needle.

Wednesday, April 18, 2018

collagraph - printing plate made from recycled material


collagraph print progress proof (shoreline study) made from a thin plate cut from beverage carton - colour not yet added


Recently I was organizing a collection of materials that originate from everyday household products. I saw potential use of finding another use for some of these things that would either end up in the recycling container or worse a landfill if they were tossed into the garbage. I was saving boxes worth to use in possible art projects with young artists either in classrooms or in workshops at community art centers.


One item that is common in this household are 1 litre and 2 litre beverage containers that dairy and milk alternatives (like almond, soy, cashew, etc.) are sold in at the local supermarket. A couple of years back I discovered that these containers worked very well for simple printmaking applications. The paper card is coated on the both the outside and inside of the container with a thin layer of plastic fused over top making them waterproof. It is thin enough to cut using scissors or utility blade box cutters.

Below is a link to an earlier blog post where I used a carton based plate to create a simple drypoint print. 

http://myprintmakingjourney.blogspot.ca/2017/03/milk-carton-printmaking-experimentations.html


Once a week I wash out the inside of the collected empty cartons and then cut 4 panels from each carton.


I have amassed a lot of cartons over the past year and a half that have yielded nearly a shoe-box worth of panels. 


Here are instructions how I achieve getting panels from a beverage carton (if you are wanting to try this for yourself). Tutorial follows photos in rows across then down to next row.


Instructions

Row #1 across 
a. Using a box cutter knife lay carton on it's side. b. About 1 mm in from where the angled area of the top of the carton meets the straight portion insert cutter blade into an an area and start cutting following the edge. c. Turn the carton as you cut across each side. 

Row #2  d. Repeat using the same method to remove the bottom of the carton. e. cut in about 1 mm from the bottom. f. interior of the carton. One side has an overlap join that has been glued during manufacturing. 


Row #3 g. Stand the hollow carton on it's end and cut down side corner where the paper join is inside. h. Fold out the four panels. i. using metal cork back ruler edge trim each remaining panel away from corner edges by about 1 mm. (this removes the raised edges). I cut my panels on a plastic cutting mat. 


Row #4 j, k & l show trimming of individual panels.


( Note: Some cartons have little embossed markings in a bit from the bottom of the carton. I generally trim this area away.) 


the small panel I cut from a milk carton to use for creating a collagraph print. Plate size is 8.25 x 14 cm ( 3.25 x 5.5 inches). The text on the printed side is in both english and french. Canada is a bilingual nation.


Motivation for this recent project was landscapes from my region. I decided to construct a plate that would print as a collagraph. At present I have only done one plate to date and pulled a couple of progress proofs on rag paper. I am deciding whether to incorporate an additional plate or two or add colour elements to the print image through hand tinting of the printed image.

Stages of the collagraph plate


I started by first tracing an outline of the panel cut from the carton on scrap paper. Then I made a basic sketch of the landscape within the borders of the rectangle. This image was then traced onto thin vellum using a 6B graphite pencil.


tracing in 6B graphite made on tracing vellum


vellum is flipped over and by re-tracing over the visible drawing (that was done in 6B graphite on the backside) the image is transferred to the panel plate surface. The image on the plate would then be as a mirror image. 


graphite is visible on the plate surface. Darker areas would be achieved with recessed areas holding ink. I cut using a scalpel and carefully peeled back surface. Exposed paper fibre is rough in texture.


detail of where I cut and peeled away surface layer to reveal rougher paper underneath. I began adding in small details along the top edge that would hopefully read as a tiny treeline


Since the plate was small and I was working with aging eyes that don't focus as well on small things I used a swing-arm magnifying lamp to enlarge my view while working on the plate


to help reveal the small marks I made in the surface and cut away areas a little charcoal powder was gently brushed over this areas. I then ran some tissue across the surface to remove excess powder.


after working on below surface elements I concentrated on the addition of low relief surface textures. I used a couple of mediums to achieve these.


small amount of acrylic modeling paste was applied to create the foliage of a small shrub.  I used a very small brush tip and also the end of an embossing tool to work the medium on the surface.


I also applied thin areas of acrylic based micaceous oxide with a brush. The very fine particle in the charcoal hued medium would print as small mid tone on the rock surface.


I sealed the plate with clear shellac when all the textural mediums were dry to touch. 
Black Caligo safewash etching ink was mixed with a small amount of easy wipe medium. I applied this to the plate surface with a  tightly rolled crafting felt dabber. Surface ink was removed by wiping with a fine mesh polyester wiping fabric (quilt interfacing from a fabric shop) followed by a few swipes with the barrier glove covered palm of my hand and a piece of old telephone book page.
The plate was set inked side facing up on my etching press bed and slightly damp Somerset rag was set over top. A piece of newsprint was laid over this followed by three wool felt blankets. I adjusted the press roller gauge to a fairly tight pressure and turning the gears passed the plate/paper/felts under the roller. After I removed the print on paper from the press bed it was fastened to a smooth thin wood particle board for drying using gum adhesive butcher's tape.

My next blog entry will most likely show the introduction of  colour into this image.