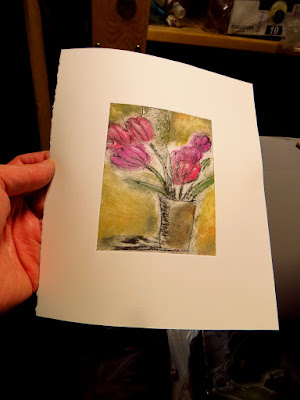
 A couple of weeks back I began exploring the possibilities of producing prints from plates that are made from milk cartons. Mainly the inner surface of the cartons which protect the liquid inside be they milk, juice or beverages derived from nuts or seeds.
This all started with a drop-in art activity for children that I volunteered to give at a local art center. I had seen a photo online of a young woman who had taken a printmaking workshop (not sure where or when) and she mentioned they were having fun making prints from milk cartons. This caught my interest.
Anyhow I had been saving cartons for other uses (making bird feeders, snow scoops for snow sculpture construction) and discovered I had quite a few amassed in my cellar. These had previously been rinsed out with warm water after their initial purpose was complete. I carefully cut the tops off then slit the sides using a utility blade . Some edges had wrinkles in the surface (perhaps from rough handling when these were put by staff on supermarket shelves or during transport from the shopping cart to my refridgerator) so I had to trim these wrinkled areas off the plate. I ended up with a collection of various square and rectangular plates.

Here is the plate I used for the demonstration (middle) and resulting print (left). The other piece (right) is from the front side of the original carton. I made a direct drawing using a drypoint needle right into the surface of the plain white reverse side of the plate.
The young artists who came to the drop-in had a lot of fun drawing on the plates and then scratching over the pencil line using needle tools. They wiped Akua intaglio ink into the lines and wiped the plates using newsprint and tissue paper.
They got the opportunity to turn the etching press wheel when these were printed and then take their prints and plates home afterwards.
Since the plates were small it was easy to put several on at one time for a pass under the press roller.
I brought my plate home and decided to see what else I could do with it since it was still very printable after my initial demo print at the drop-in.
I once again applied Akua carbon black intaglio ink to the plate and wiped it back with a soft polyester mesh. Then I wiped the surface back with a piece of old yellow pages from an old phone book. I then spot dabbed colours of thinned Akua intaglio (thinned by adding a drop of Akua blending medium). These were carefully wiped using tissue over my pinky finger tip. This method is known as À la poupée.
I set soaked and blotted Magnani cotton rag paper over top and ran it through my small etching press.
The result was very favourable.
I noticed a bit of peeling starting to occur around the line edges on the plate. I carefully lifted the peeling area of the surface and peeled it back making sure it didn't take up any of the elements inside the line. In essence this left slightly raised surface area. The area exposed from peeling was a bit rougher in texture. I again applied ink to the plate and wiped it back. However this time I selectively did a bit more removal of ink with tissue over finger tips and also a bit of strategic highlighting using cotton swabs. And the result came out like this in the photo below.
I have pulled a few more prints from the plate and fear now it is deteriorating fast. I believe that milk carton plates are good really only for small editions of perhaps up to 8 images.


Terrific idea ! Love the "peeled" one - it has an almost lithographic feel.
ReplyDeleteThese are gorgeous! What a great idea!
ReplyDeleteThanks for your detailed explanation.
ReplyDeleteWhat did your young students use to inscribe the surface of the plate?
Hello and thanks for your detailed explanation.
ReplyDeleteWhat do your students use to scratch into the surface?
Thankyou for your detailed explanation.
ReplyDeleteThat was great to read. I am just embarking on a similar journey, using cartons and a pasta making machine. I have discussed this with someone who has made small prints in exactly this way, and have examined the results - which were very pleasing.
ReplyDelete