 |
| Larger size coffee tetra-pak container |
I have accumulated a good collection of newer tetra-pak coffee containers over the past couple of years. Although I am not a coffee drinker myself my better half consumes several cups of the brew daily and favours a particular brand that is packaged in these large containers.
I discovered a larger container on the market being used by some supermarket chains to replace plastic or metal coffee tins. These are an ideal source for tetra-pak plates that can give you a slightly larger area than those cut from the containers that are used for liquids.
I figured out a way to dissect the containers after the ground coffee was exhausted so decided to post a photo image tutorial of the process I use to create a range of plate sizes from the foil and paperboard interior surface. It can be a bit tricky as the container has rounded continuous corners. But I was able to dissect the packaging using some simple logic and careful steady cutting.
Tip: do your cutting on a surface that isn't going to be an issue if cut marks show up in it. I used a self-healing cutting mat.
The photos are in sequence and illustrate how to cut plates from this type of container.
1. Using a sharp retractable knife or scissors cut away the pull lid that is attached on the left side. This doesn't have the foil liner for this so you can either use it for other artistic purposes or put into recycle bin.
2. unfold the curled in edge on the bottom of the container.
3. Carefully cut and remove the bottom piece (that is lined with foil on the underside).
This can be used for a small square print plate.
4. cut along the seam on the side of the container
5. Now for the tricky part. This requires a bit of patience and skillful cutting.Don't apply too much pressure while pushing down on the container as you don't want to inflict creasing into the sections you are intending to use. I cut a section at a time and set each one aside until the entire container has been dissected.
6. Once you have all the sections cut away you can focus on trimming away the pieces where the lid on top and bottom were joined to the container body.
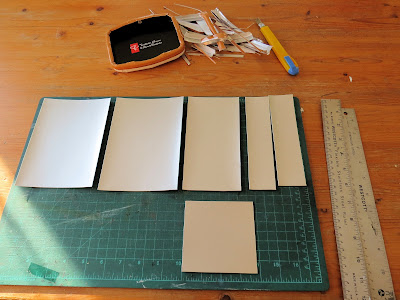
7. I chose to square off all the edges. The single container yielded 2 larger plates, one mid size and a smaller square and 2 narrower rectangular pieces. The largest plate measures 12.5 x 16 cm.
Here are two test prints I made off a couple of the tetra-pak plates. I used an etching needle on both. Akua prussian blue intaglio ink was wiped back on the horizontal plate shown on top in the photo below. The other plate I trimmed the edges in spots to give it more of a free form. Akua pthalo blue and green were wiped into the surface then both plates were printed using an etching press onto Magnani 250 gsm dampened cotton rag paper.


