
Here is my print studio in a low ceiling poorly lit basement
I am considering buying and assembling a prefab satellite structure that could be housed in the back yard
Some of my artist friends are part of studio tours here and in other communities where they live and work. They have been fortunate to have spaces in their homes where they can have people come by and see them working on their art and also have a display of work on the walls for viewing. I have not been so fortunate to date with my own set up.
My partner and I live in a fairly old 1-1/2 story small house (it will be the grand old age of 100 in a couple of years) and since we have lived in it (14 years now) and has been undergoing updating in small increments as time and money will allow.
I have a small number of my art work in frames and hung on walls but they are scattered around the house. Some are not even really accessible to guests for viewing. So I have had to decline invitations to participate in studio tours to date. To be honest I am even embarrassed to have other artists see my printing studio...so I avoid showing it at all costs...until now that is (see photo above).
Anyhow I have been seriously thinking of late about trying to find space here at my home where I can have a prep area to work on designs but also have my printing area close by and a wall or two for gallery, in other words an all in one studio space. At present I have three seperate areas in the home I use. The large pine table in my dining nook (which provides wonderful natural light as it has 2 walls with windows) and is where I create drawings, do my block cutting and engraving, etc... I have another room (office/library) where we have our Dell pc and Epson printer/scanner. This is the room where I do photo editing, scanning of artwork and printing of transparencies.
Finally there is the printing area. This is an area in my basement that has a low ceiling (6 ft of overhead clearance...one has to duck under the main support beam when they are navigating around). It is a bit dark down here, it is not finished and can be damp in the warmer weather (not so great for an etching press). There is a dehumidifier that helps during the year when the gas furnace isn't running, plus have rigged up several daylight compact flourescent lights around my printing table and press, but....things could be better. Given that my health is getting more fragile as I age (especially with things like air quality and mold, dust allergies) it would be nice to be in a place where I can breath healthy, have natural light to work by and be able to have a work desk in one corner, my press and printing bench in another and also some area with organized shelving for paper, inks and tool storage.
Given that I do not have any other options inside of my home for a proper studio I may have stumbled across a possible solution.
One of these is something that caught me eye by accident while doing a Goggle search on art studios. It is called a Modern Shed. Given that there is a bit of free area in my backyard this just might be the solution I am looking for.
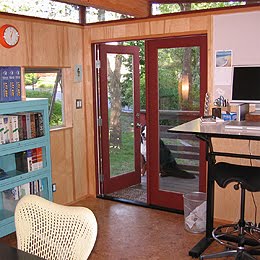
In the third and fourth photos posted below is an interior of one the sheds. I like the angled ceiling idea with the bit of light allowed in at the front at the top in addition to that from the windows. This structure for my own use would definitely have to be insulated given the area of the world where I live and would have to figure out a way to keep it heated in the winter (solar, small gas fireplace or wood burning stove?) and have a source of electricity (solar panel mounted on top or nearby perhaps or something immediate such as running an extension cable from my house plugged into an outside outlet?).
As an artist/printmaker who uses a lot of water soluble or water based mediums (enviro friendly non- toxic thankfully) I would most likely have to construct some form of washing up area (perhaps an acrylic laundry tub that could drain into a pail underneath). I really don't want to have to worry about complicated plumbing installation so I would try and devise a practical solution for this.
Then there would be security. Maybe an alarm system that could be powered off the solar battery? Luckily I have good neighbours close by who also are around a good deal of the time so that helps.


I also did a bit of Goggle searches and found other small structures (some prefab) which might work too.

This is an interior shot of a structure made by a company called Modern Cabana

and a company here in Canada manufacture perfab spaces such as this little beauty


