Showing posts with label landscape. Show all posts

Monday, March 1, 2021

more dry point from acrylic plate

Kayak on shore, drypoint 2021 


Recently a friend of mine and I were talking about kayaking. 

Our conversation led me to reminisce about a few outings I had made in a kayak not so long ago. I remembered there were a few photos taken during my excursions that had been kept on file. I thought maybe it was time to incorporate the subject into some type of art work. I made a quick sketch while looking at one photo of the kayak I had been using at that time. I also looked at a few landscapes and waterway photos.


rough sketch in pencil


I had a small piece of 2mm thick clear acrylic plate (framing plexiglass) and decided to take the sketch and configure it to create a small dry point study on the surface of that plate. To achieve this I first scanned the original sketch and with the graphics editing program I use (Corel draw) resized this to fit the dimensions of the plate (2.75 x 4 inch rectangle).

On the reduction size inkjet print out of the sketch I then added more elements in pencil that would define more trees, rocks and such. The plate was set over top of the sketch and taped in place (with tabs of clear cellophane in the corners to anchor it to my drawing board). I set this underneath a lit magnification swing-arm lamp and started working the surface (with the sketch underneath as my guide). I used a variety of sharp tip needle tools to achieve this. 


clear acrylic plate set over top of inkjet reduction print
that has more details added in pencil


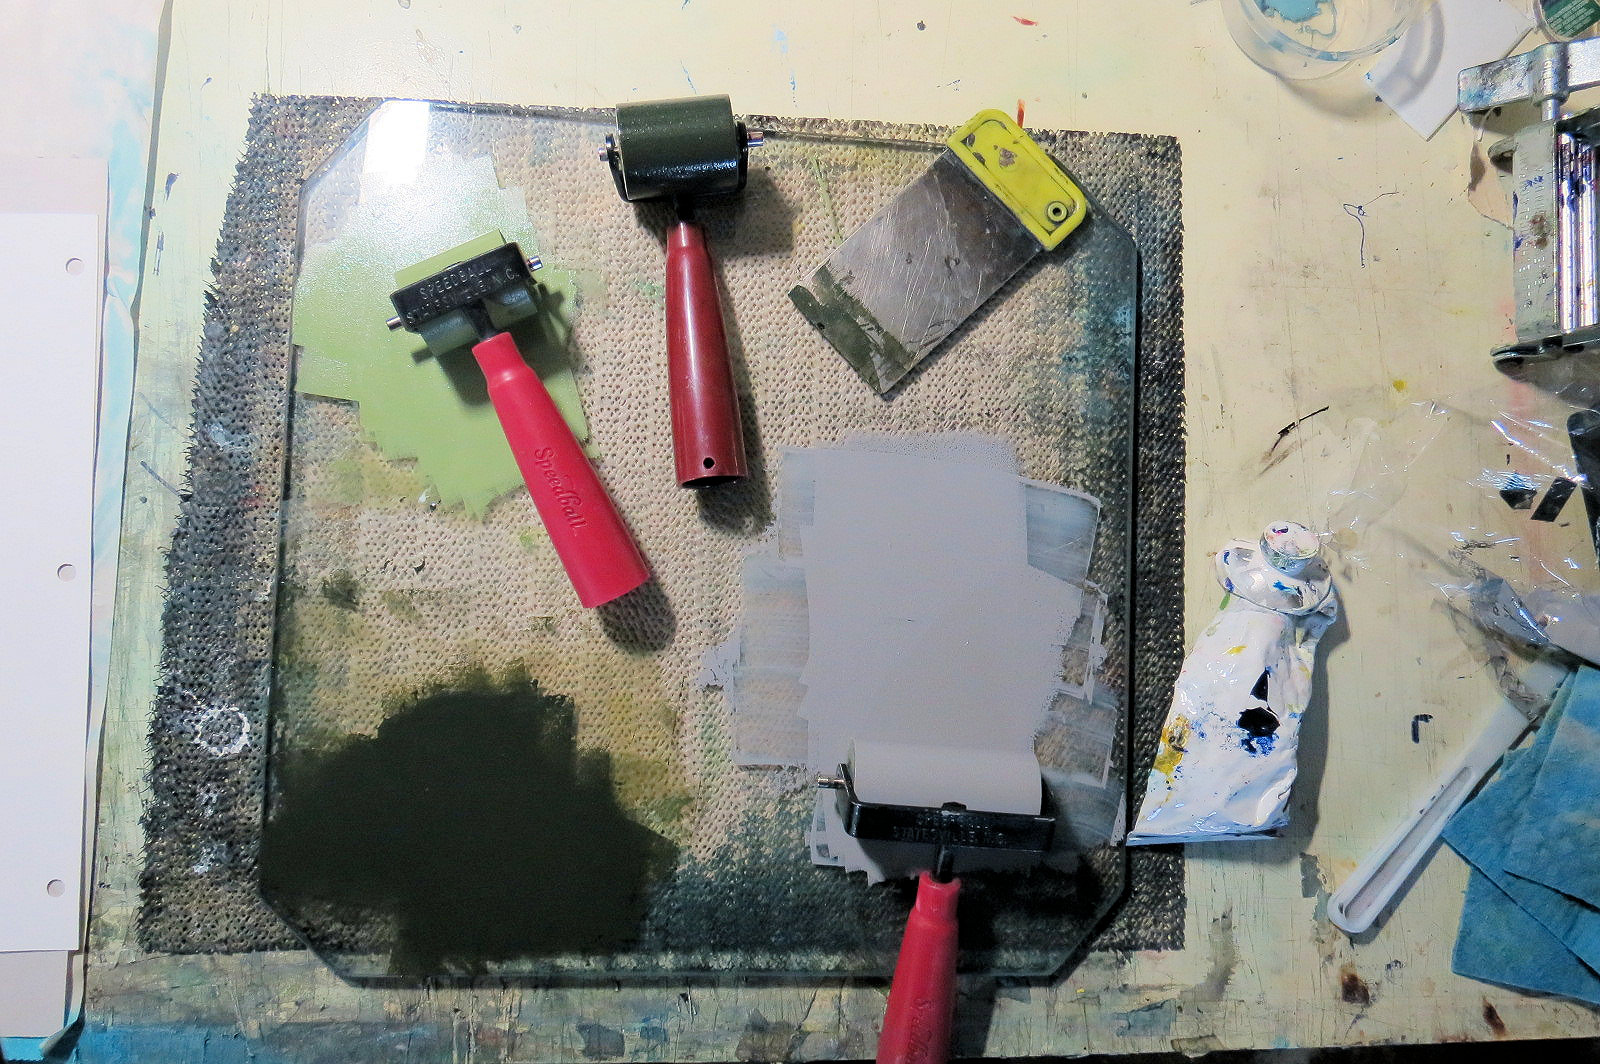
the area and table where I do my preliminary work before printing 


tools for drypoint - one is repurposed (the retractable
mechanical pencil lead holder with compass needle point).
The light wood dowel contains a darning needle
(countersunk in a small drilled hole in the end.)


detail of scratch into the surface of the plate


The composition was altered with a needle instead of a pencil and on a plastic surface instead of paper. I added fine dot by creating areas of stiple marks in the surface using fast repeated pocking with the mechanical pencil anchored needle tip.

The plate edge was then beveled to a 45 degree angle with a shop file and the corners of the plate were also slightly rounded.

I applied Cranfield Safewash carbon black ink with a rolled felt dabber and wiped this back with a softer web type fabric (instead of tartalan cloth which would have left fine surface scratch marks in the acrylic. I immersed a few pieces of 250 gm cotton rag into water then blotted them with cotton towels and set them between newsprint.


plate reversed (inked side on the bottom of plate)
after first proof pulled on paper with press


first proof - notice how the ink prints darker tone in areas 
around shoreline rocks and in the trees due to the burr from
the plate surface.


the third print from the plate. Less contrast and gentler wiping
reveals more of the line and dot work.


Thursday, February 7, 2019

First new artwork in a while - rework of an older piece

Near Rossport along Lake Superior - 2019
four block relief print (7 colours)
image size: 15 x 20 cm ( 6 x 8 inches)


                                      My apologies to followers of this blog. It has been nearly six months since my last blog entry. I am still dealing with health related challenges and there are limitations in the scope of what I am able to do and for what length of time. However my creativity has not been stifled and I am making it a point to keep the proverbial creative fires stoked.


One way was to return to an old image and produce from it again with slightly different elements. I found an older block of mine that was carved back in 2007. The small edition six colour print originated from one carved linoleum block (key image) and three thin pieces of stryofoam mounted onto mat board plates. The shapes were drawn into, cut and mounted carefully on their supports. 
Prints were made by passing the blocks and paper under a roller (with set pressure) on my small tabletop etching press. However over time from multiple passings the styrofoam quicky deteriorated and cracked.


progress proof before some minor additions


I decided that a new version could be printed this time around by replacing the styrofoam with carved raised linoleum elements. There have been some changes in terms of water, and a mid background landform.
This was also an opportunity to use Graphic Chemical water based relief printing ink. The ink is very sticky (but keeps open on the glass slab for a day or two). It is not oil based ink but the base that suspends the colour pigments is derived from plant sources. Once printed onto an absorbent paper surface it dries quickly (a few hours in the right studio conditions.)

Tempered glass inking plate with Graphic Chemical water based relief printing inks and two sizes of rubber brayers.


Four blocks in total were used. Two blocks had separate pieces of lino cut apart that were glued onto an equal size substrate. Since some elements had separation between them I was able to use one block to print 3 colour elements in a single pass. Small brayers allowed me to apply ink to the raised lino shapes. The first block that created the water and sky used a blend of inks rolled out on the glass. I put two small dollops of different tones of blue and then a bit of white ink beside the lighter blue.


A registration board system was used that had a 3 hole punch to hold the paper in place and also an area that the blocks of equal size could be held steady and would line up when printed in layers.


progression from block #1 - blend of blues and white followed by the layer of ink from block #2 far dusty blue-teal landform


Wednesday, May 2, 2018

print from a single plate that combines three techniques

https://www.etsy.com/ca/listing/612814647/small-landscape-combination-drypoint?ga_order=most_relevant&ga_search_type=handmade&ga_view_type=gallery&ga_search_query=&ref=sr_gallery-1-39


Back in October of last year I posted about a print I had made from using a single clear acrylic plate. 
http://myprintmakingjourney.blogspot.ca/2017/

This combined colour relief roll, monotype and drypoint. I had only made a couple of prints at that time. The plate was put into a safe place and I became involved with other projects   

Over the past couple of days I decided to return once again to printing a small edition off of this plate. I took photos during the process which I believe may explain better how I achieved each print on paper from the plate. I am hoping to print an additional 6 for a total of 20 over the next day or two. To date I have printed 13.

I am printing these using Caligo Safewash etching inks. The etching ink is also used for the relief/monotype stage.


Each print is made onto Somerset satin white rag. Using moisture activated butchers tape I affix each print onto a thin mdf panel where they are allowed to dry. The tape also keeps the slightly damp paper from buckling. 


The plexiglass (aka perspex) plate. Here the surface scratched line is revealed by applying and wiping black etching ink across the surface.


The plate showing colour relief roll of ink on the surface and the beginning stages of subtractive monotype. I create a colour blend for the blue on another larger piece of acrylic using a soft rubber brayer. I achieve this by applying prussian blue with a little white to establish the darkest hue at the top. I set a little white a couple of inches beside this and by rolling the ink with the brayer forward many times the two intermix until a nice blend from dark to light occurs. I then carefully transfer this from the roller onto the plate surface.
The light biege ink on the bottom foreground rock was applied with an even smaller width rubber brayer. This is achieved by first determining by eye where to start the brayer to meet at the line of blue and moving it across the surface to deposit the ink and not touch the wet blue ink. It requires a bit of skill and steady hand co-ordination.


Here you can see where I have removed ink using various tools (cotton swabs, rolled tissue, tip of a bamboo skewer) that will print as negative space.


Result of the printing of the colour relief roll and monotype for the first stage. 
The plate was set onto the press bed inked side facing upwards. I used a registration sheet underneath with markings made in light pencil to center the plate and also indicate where the corners of the paper should be. Soaked and blotted Somerset satin 250 gm rag was set over top. A piece of clean newsprint was set over the somerset and then the three wool felts were placed over all of this. The plate had a 45 degree bevel filed along the edges earlier. The pressure of the roller created an embossed mark around the print edges during printing. This will assist in positioning the plate a second time (ink side facing down) for the drypoint.


The colour ink residue was cleaned off the plate surface (using a rag and vegetable oil). I wiped carbon black etching ink into the recessed lines that were scratched on the plate earlier (the drypoint component). 
So now came the really tricky part. Carefully using a combination of steady hand and eye coordination I positioned the plate ink side facing down and set it over top of the colour print. The emboss from the bevel helped me to set it into place. 
I then set my clean hand over the plate. I placed my other hand underneath the paper and with a bit of slight pressure set it under the area where I had the plate pinned to the paper with the other hand on the opposite side. 
I slowly flipped it over so that the plate was underneath. I set this down on the press bed at a 45 degree angle and as the plate was lowered into a horizontal position I removed my hand slowly from underneath but made sure my hand over top of the paper and plate was pushing and making sure the plate wasn't slipping out of position underneath. I could tell once the paper was down flat as the raised shape of the plate from the previous printing held the plate in position. 
Clean newsprint was set over the back of the paper and once the felts were lowered. This time I set the hand that wasn't turning the press gears on top of the felts over the plate and paper area to hold in place until it was caught by the edge of the roller as the bed was moved under the roller.
When I lifted the paper after it had cleared the roller on the other side I saw that the drypoint element had printed nicely where it should be and the colour underprint was also in alignment.


Prints drying in a warm room. I use both sides of the boards to attach prints so angle them slightly out from the wall to allow for airflow on both sides during the drying process.


Wednesday, April 18, 2018

collagraph - printing plate made from recycled material


collagraph print progress proof (shoreline study) made from a thin plate cut from beverage carton - colour not yet added


Recently I was organizing a collection of materials that originate from everyday household products. I saw potential use of finding another use for some of these things that would either end up in the recycling container or worse a landfill if they were tossed into the garbage. I was saving boxes worth to use in possible art projects with young artists either in classrooms or in workshops at community art centers.


One item that is common in this household are 1 litre and 2 litre beverage containers that dairy and milk alternatives (like almond, soy, cashew, etc.) are sold in at the local supermarket. A couple of years back I discovered that these containers worked very well for simple printmaking applications. The paper card is coated on the both the outside and inside of the container with a thin layer of plastic fused over top making them waterproof. It is thin enough to cut using scissors or utility blade box cutters.

Below is a link to an earlier blog post where I used a carton based plate to create a simple drypoint print. 

http://myprintmakingjourney.blogspot.ca/2017/03/milk-carton-printmaking-experimentations.html


Once a week I wash out the inside of the collected empty cartons and then cut 4 panels from each carton.


I have amassed a lot of cartons over the past year and a half that have yielded nearly a shoe-box worth of panels. 


Here are instructions how I achieve getting panels from a beverage carton (if you are wanting to try this for yourself). Tutorial follows photos in rows across then down to next row.


Instructions

Row #1 across 
a. Using a box cutter knife lay carton on it's side. b. About 1 mm in from where the angled area of the top of the carton meets the straight portion insert cutter blade into an an area and start cutting following the edge. c. Turn the carton as you cut across each side. 

Row #2  d. Repeat using the same method to remove the bottom of the carton. e. cut in about 1 mm from the bottom. f. interior of the carton. One side has an overlap join that has been glued during manufacturing. 


Row #3 g. Stand the hollow carton on it's end and cut down side corner where the paper join is inside. h. Fold out the four panels. i. using metal cork back ruler edge trim each remaining panel away from corner edges by about 1 mm. (this removes the raised edges). I cut my panels on a plastic cutting mat. 


Row #4 j, k & l show trimming of individual panels.


( Note: Some cartons have little embossed markings in a bit from the bottom of the carton. I generally trim this area away.) 


the small panel I cut from a milk carton to use for creating a collagraph print. Plate size is 8.25 x 14 cm ( 3.25 x 5.5 inches). The text on the printed side is in both english and french. Canada is a bilingual nation.


Motivation for this recent project was landscapes from my region. I decided to construct a plate that would print as a collagraph. At present I have only done one plate to date and pulled a couple of progress proofs on rag paper. I am deciding whether to incorporate an additional plate or two or add colour elements to the print image through hand tinting of the printed image.

Stages of the collagraph plate


I started by first tracing an outline of the panel cut from the carton on scrap paper. Then I made a basic sketch of the landscape within the borders of the rectangle. This image was then traced onto thin vellum using a 6B graphite pencil.


tracing in 6B graphite made on tracing vellum


vellum is flipped over and by re-tracing over the visible drawing (that was done in 6B graphite on the backside) the image is transferred to the panel plate surface. The image on the plate would then be as a mirror image. 


graphite is visible on the plate surface. Darker areas would be achieved with recessed areas holding ink. I cut using a scalpel and carefully peeled back surface. Exposed paper fibre is rough in texture.


detail of where I cut and peeled away surface layer to reveal rougher paper underneath. I began adding in small details along the top edge that would hopefully read as a tiny treeline


Since the plate was small and I was working with aging eyes that don't focus as well on small things I used a swing-arm magnifying lamp to enlarge my view while working on the plate


to help reveal the small marks I made in the surface and cut away areas a little charcoal powder was gently brushed over this areas. I then ran some tissue across the surface to remove excess powder.


after working on below surface elements I concentrated on the addition of low relief surface textures. I used a couple of mediums to achieve these.


small amount of acrylic modeling paste was applied to create the foliage of a small shrub.  I used a very small brush tip and also the end of an embossing tool to work the medium on the surface.


I also applied thin areas of acrylic based micaceous oxide with a brush. The very fine particle in the charcoal hued medium would print as small mid tone on the rock surface.


I sealed the plate with clear shellac when all the textural mediums were dry to touch. 
Black Caligo safewash etching ink was mixed with a small amount of easy wipe medium. I applied this to the plate surface with a  tightly rolled crafting felt dabber. Surface ink was removed by wiping with a fine mesh polyester wiping fabric (quilt interfacing from a fabric shop) followed by a few swipes with the barrier glove covered palm of my hand and a piece of old telephone book page.
The plate was set inked side facing up on my etching press bed and slightly damp Somerset rag was set over top. A piece of newsprint was laid over this followed by three wool felt blankets. I adjusted the press roller gauge to a fairly tight pressure and turning the gears passed the plate/paper/felts under the roller. After I removed the print on paper from the press bed it was fastened to a smooth thin wood particle board for drying using gum adhesive butcher's tape.

My next blog entry will most likely show the introduction of  colour into this image.

Friday, March 30, 2018

studio activity - collagraph print


Summer evening

Recently I made a return to collagraph plate printing. I am in admiration of the works of a many print-makers that I view online. Through social media I have been able to converse with a few of them. Our exchange of info has renewed an enthusiasm for again experimenting with the medium in my studio.

                                The image shown at the top of this blog post (Summer Evening) is the result of the combination of two mediums, those being monoprint and collagraph. The past couple of days I have printed a range of images off plates (anywhere from one up to three plates). The first few have been mostly printed to test the image produced by alterations to the plate surfaces.

Let's start at the beginning. The print began by making a free hand sketch referring to a photo I had taken in the late summer of 2013 during an evening on the shores of a lake where I was staying. I had the photo displayed on my tablet and reversed it using mirror image in my photo editing app. The plate would require imagery to be in reverse so that during printing it would reverse to the original direction.

I drew the landscape and foliage in graphite onto a piece of smooth mat board that was trimmed to 11.5 x 11.5 cm (4.5 x 4.5 inches). I went over the graphite with permanent black fine line marker. Using a scalpel blade I scored into the outline of the distant hills and the silhouette of a rock outcrop that would protrude into the water just in front of this. I carefully removed the first surface layer of paper from the board by lifting and pulling it slowly back. The core layer of the mat was exposed and left a slightly rough surface (that I wanted). 
Then I sealed both the surface and the back of the plate with a thin even coating of clear shellac using a 3/4 inch wide soft taklon paint brush and also by wiping the wet shellac across the plate surface with a soft lint free cloth.


the plate with the landscape and foliage would print as the key or main definition image.
here the plate shows the area that was cut with scalpel and surface paper removed for the distant hills and the outcrop of rock into the water.


When the shellac was dry I worked into the surface of the coated plate where the foliage areas were drawn using an xacto knife tip and a diamond tip drypoint tool. I then wiped black oil based etching ink on the plate surface and into all the areas below the surface. I polished the plate surface with newsprint and set a soaked + blotted scrap piece of cotton rag over top. I ran this on the press bed under the tightly set roller of etching press to see how it would print and pick up the fine line detail in the foliage areas.


I then made a second plate (using same size scrap of mat board as the first). This would be to produce an interesting cloud formation in the upper area over the hills area. To achieve this I first placed a piece of thin tracing paper over the print I had made from the first plate. Using HB graphite I sketched shapes that would hopefully read as cloud formations when the plate was worked. I flipped the sketch over with 4B graphite traced the lines showing through. I reversed the paper once again and set this over the second plate surface. I retraced the lines with regular graphite pencil so the heavier graphite underneath transferred to the plate surface. I cut into the plate surface using scalpel again and created recessed areas to contain ink and print darker. Then using a surface application of pva glue and acrylic gel medium dabbed on using a finger tip or small brush tip I randomly worked the viscous mediums around and into the cut recessed areas. These were allowed to dry and then I lightly sanded them back using a fine grit sanding block. Two layers of shellac were applied to the front and back of the plate. Once dry I wiped a bit of thinned prussian blue oil based etching ink into the plate surface and printed it on a small scrap of cotton rag that had been soaked and blotted. 


2nd plate with cloud formation created using combination additive and subtractive processes to the plate surface
detail showing removed surface and addition of gel and pva medium to create low relief shapes


thinned prussian blue oil based etching ink was wiped on the plate. The resulting print on paper.


I then re-inked both plates and printed them one after another onto another scrap of cotton rag to produce a 2 colour print. 


two colour plate print - testing proof


Combining Monoprint and Collagraph plates


I thought that instead of introducing colour in the usual manner I had been using (hand colouring with watercolour or liquid acrylic inks) it might instead be worth trying the addition of a third plate. It took a bit of pre-planning plus the use of small brayers but I was able to succeed in blending etching inks on an acrylic plate as a monoprint element. Due to the small size of the plate it proved to be a challenge to roll colour into small sections.  It requires a great deal of patience and practice I very quickly learned.


The above print was created using Akua Intaglio inks on soaked and blotted Canson Edition cotton rag. The inked was rolled out to a very thin transparent state on a plate cut from 2 mm acrylic sheet (a non-glare type used as an alternative to glass as protective cover over artwork in framed work). In addition to roll blending areas of ink were also removed from the plate surface carefully with gentle dabbing of the tips of cotton swabs.


a slightly thicker layer of blended ink for the monoprint background influenced the way ink from the 2nd plate printed over it.  The result created whispy blue tinted cloud formations


The real challenge with combining plates is accurate registration of each plate. If it is off ever so much the result can be disastrous in success of the print image on paper. I chose to set each of my plates down over the monoprint on paper using careful & steady hand/eye co-ordination. Each plate would set into the slight embossed lower area of the first plate print then would have to be flipped over and set on the press bed with the rag paper over top. I found using a thin piece of bristol card (same size as the print paper) helped provide a firm support to set the inked plates and paper on and made the turning over process a little less stressful. I did have one image off register though, but it was part of the learning process.

Anyhow my plans are to keep going with the edition and see how many prints the plates might yield.


Tuesday, October 31, 2017

new work from the studio


Finally found time this year to return to the studio and pursue a few ideas I have been wanting to translate to prints.
Shoreline is a new study that originates from a drawing I did while touring the north shore of Lake Superior. It is a small image that measures 8.5 x 8. 5 cm (3.5 x 3.5 inches). It was originally intended to be a collagraph, but reality struck when I realized the small size would be very difficult to construct a plate especially with the fine details in the rock, trees and island. So a decision was made to interpret it as a drypoint.

I transferred my sketch on matboard plate onto clear acrylic plexiglass (perspex) and using a fine point needle scratched lines into the surface. I wanted additional texture in the foreground rocks and achieved this by applying pressure using the back of a metal spoon rubbed onto the back of a small piece of cut coarse sandpaper. 

Akua intaglio ink (carbon black and a hint of white mixed in) was wiped into the lines and damp cotton rag paper was set over top. I printed about four of these. My plan is to apply hand-colouring to these prints when they are dry. 


The next phase was to combine a monotype on the surface of a second plate (equal size of the drypoint plate). The monotype was made on thin acetate using rolled thinned colours of etching inks onto the surface. I then used cotton swabs, pencil point and bristle of small brushes to remove ink and make marks.

However I had only printed two versions using both plates and noticed off registration occurring in each. I made notes during the process. 

Observations

The 3mm key plate had been filed along the edges at a 45 degree angle.

The thinner acetate plate was cut to the same dimensions as the other plate. It did not have a angled edge.

Bristol card was used a bed liner and registration template for the plates. I had anchored the edges of the template with small tabs of painters tape onto the acrylic bed. The plexiglass plate was traced in light pencil on the template. Another light pencil outline as made several inches outside the plate position marks that I could use to line up the print paper. 


I had a piece of thicker plexiglass already set on top of my phenolic press bed. However past experience taught me that setting plastic plates onto a plastic surface did not result in a good outcome.  Many times I had noticed the plate had angled when it was subjected to the high pressure of the roller. Generally taping a piece of paper to set the plate onto usually keeps the plate from shifting. Possible problems:


  • Perhaps shifting was occurring when I passed the plates under the press roller? 
  • Was the coated side of the bristol card not providing enough grip and possibly not creating an indentation in the surface from the plate under pressure? 
  • Should I use another material for a press liner such as mat board? Was the off register being created when the plate was meeting the roller?  
                                                                             
misalignment of plates noticeable on sides


Possible Solutions 

Pass an inkless plexiglass plate through the press with enough pressure to see if it might make an indentatin mark in the Bristol card.


Trim the acetate sheet to fit the inside dimensions of the indentation in the registration sheet. This would allow the bevel edges from the main plate to emboss as a clean edge with no carry over of ink.

Forego the monotype plate. A fellow printmaker from an online community suggested that I try inking/wiping the plate and then applying a relief roll of thinned inks on the surface.


Success with single plate approach

I decided to take the advice and try the relief roll. This time around I used Caligo Safewash etching inks. I applied two colours with small brayers. For the sky I used a blue mixed from a combination of prussian blue with a little white modified with medium. The colour for the foreground rock was a combination of three process colours (magenta, yellow and cyan) with a little white and modifier to make it transparent.

The surface was carefully worked into with cotton swabs (clouds) and using the tip of a pencil to make tiny lines in the blue ink (above the rocks) that created the effect of light on the water surface and the horizon line.

I was pleased with the result when the print on paper was revealed after passing the plate under roller. And also no slipping or angling of my plate as I reversed the bristol template and had used the uncoated side to lay the plate onto.

My lesson learned here was that being patient and having a spirit of adventure can sometimes yield a favourable outcome.