Showing posts with label etching. Show all posts

Friday, May 27, 2022

Experiment - small tetra-pak plate intaglio print

small botanical print made from a Tetra-pak plate


Several years back I came across a blog by a European printmaker who was making original intaglio prints using tetra-pak juice boxes. These containers are originally used to contain liquid foods. The boxes are constructed from paper board with a thin foil layer fused onto one side and then are coated in a thin layer of plastic. This artist was cutting panels from used containers and using these as a surface from which small hand-printed intaglio prints could be achieved. She had success marking line into the surface using needle tools. These lines would hold etching ink and would transfer to paper under extreme pressure (usually with the use of an etching press).

I recently decided to try this material out for myself, being a bit of tetra pak containers find use in this household. It was also an experiment to learn how the plate might perform printed as small detailed images. The artist who inspired me had minimal detail in her print designs and areas of dark contrast achieved by cutting and peeling away areas of surface layer. She added some line and texture in the remaining surface using a pottery needle to scribe line.

I had a sketch on hand that was recently used for a larger acrylic painting on board. I redrew my sketch onto tracing vellum (reduced scale) to fit a small plate that measures 5.5 x 8 cm (2 1/8 x 3 1/8 inches) and then reversed it and retraced the line using a 6B lead pencil. This was then positioned (6B graphite tracing facing the plate surface) over top of the tetra-pak plate and secured it with cellophane tape to the underside of the plate. I then drew over the graphite line with a fine line permanent marker. The next stage was to remove surface areas where the darkest tones (created by the ink deposits in the lower regions) would be printed.

tracing from sketch, front and back of cut panels from juice box


cutting and peeling away surface foil area using surgical scalpel blade


I carefully used a surgical scalpel to cut and remove the delicate surface area where I wanted darkest hues to print. Peeling away the plastic coated foil from the cut surface areas revealed a coarse paper board texture. This might hold a fair bit of ink which in turn would print dark after the wiping back of the plate before I printed it onto a soaked and blotted cotton rag paper.

plate ready to be printed after inking and wiping surface with newsprint


first print that ink was too spotty and weak


the second print


I applied Caligo safe-wash black etching ink again using a homemade rolled felt dabber and wiped the surface with yellow pages from an old phone book. The ready to print plate was then put on my press bed on a registration sheet, clean cotton rag paper was set over top along with an equal size piece of newsprint and then the felt blankets. I set my press roller to deliver tight pressure when the bed was passed under the metal top roller.

Unfortunately print #1 didn't yield a good image. The ink was faint in a lot of spots. Could have been any number of factors that caused this (too much wiping, ink too thin, paper too damp, etc...). 

After some modifications and a second inking of the plate results for the second print were better. There was some good contrast happening between dark and light areas. However that being said a lot of the tiny lines that were scribed into the surface didn't appear to deliver the details I was hoping for. I believe that the small size of the plate and the shallower surface marks made by the tools didn't deliver as good an image as those from a metal or plastic plate. None the less, I still see possibilities with tetra pak prints of small size maybe using designs with basic outlines and simplistic detail lines. I plan to explore this again soon.  


Sunday, January 24, 2016

Collagraph part II - using low relief dense foam

Shoreline
2007
Collagraph


In my previous post I showed a couple of prints of mine that combined various low relief materials to produce a print on paper. One of the materials that was used was low relief pieces of scratch foam printing plate. 

This material has the ability to embed other shapes into it's surface. It can be used to great effect for adding interesting details to a collagraph print.


I pressed medium grit sandpaper into the foam surface to give this a grainy texture. I followed this by stabbing the foam with a pen tip to give me slightly larger depressions. For some crack lines I drew across with the point of a bamboo skewer.
The objective here was to create a pocky hard rock surface which is very common to the region where I live. 
The mission with this collagraph was to convey a sense of the landscape and elements of Northern Ontario...lots of water with an abundance of Cambrian Shield rock interspersed with boreal forests.


I cut and glued down the foam pieces onto a thick paperboard substrate. Then using an xacto blade I cut away and shaped the material. Using a ballpoint pen tip I was able to press into the foam and create pockets for darker areas to be made when the ink would be applied.

I was able to coat the foam and rest of the materials on the plate using shellac. Once it was dry then thinned etching ink was applied to the plate and it was wiped back and printed.


This is a magnified detail from a section of a test print from another study (5 colour relief print) showing how the texture came about from the styrofoam.

Wednesday, December 9, 2015

solar plate etching A la poupée


just doing some experimentation with spot inking very small plates.
this plate is only 2 x 2 inches (50 x 50 mm). It is a solar plate with a pen and ink drawing of a chickadee I exposed onto it. Here's what happened:

  • I applied caligo carbon black first and wiped back
  • then using tiny rolled up felt dabbers applied on Akua intaglio pthalo blue, red oxide and burnt umber. Spot wiped these with thin tissue and tip of my pinky finger.
  • The first pass looked interesting but the black in the bird wasn't reading well. Cleaned and inked the plate again in black.
  • Carefully set plate into the paper where it had slightly embossed and flipped it over on the press bed and ran this through a second time. Bird emerged much better with the additional black and thankfully the plate and print were lined up perfectly, otherwise I would have gotten a double image.
  • Not sure how the got a textural effect in the blue background...maybe water drops on the paper, the way the ink was wiped? None the less I am not objecting to it...gives an interesting background effect.

Wednesday, November 11, 2015

translating a sketch into an etching


Downy
etching with hand-colour
2015


Chickadee
etching with hand colouring
2015


I recently made a couple of sketches based on early winter birds that are common in the area where I live. These are also inspired by the writings of Henry David Thoreau and his observations of birds and wildlife.


I placed a pencil sketch underneath a piece of wet media acetate film alternative. Using water thinned acrylic ink and pure ink line drawn with a crow quill pen and fine point pigment marker I adapted the sketches to monochromatic form. 


I then scanned the artwork and reduced it in scale. It was printed using black ink only on my inkjet printer on a clear piece of inkjet transparency film.

These were exposed onto small pieces of solar plate using ultra-violet light (a homemade unit I built using black lights). Unfortunately I wasn't afforded the luxury of a cloudless sunny day to make the exposure out of doors using sunlight.


I pre-exposed the plate first to an ultra-fine dot aquatint screen (for tonal variations and that would keep the etch shallow on the plate surface for about 45 sec. Then I followed by exposing the film based art to the plate surface for about 1 min duration. Each plate was gently scrubbed with an old toothbrush immersed in tepid tap water for about 2 min. I blotted the plate with paper towel and post-exposed it again to UV light for about 10 min. The post-exposure cures the polymer into a tough as nails material but keeps the etched areas.


inked small polymer plates ready to be printed

Carbon black veg. oil etching ink (Caligo Safewash) was wiped into the etched areas and the plates had the surface polished with thin tissue paper. 
I set the inked plates facing upwards on the press bed of my small Richardson press and set slightly dampened 250 gm Magnani Revere felt finish cotton rag over top. The paper is a warm white hue.
Blankets were lowered over top and having a tight pressure set passed the plate bed by hand turning the gear levers on the press.


I had built a home-made drying system out of some reclaimed wood, old picture wire, miniature stainless steel clips, plastic clothes pins. The prints were clipped and allowed a week to dry in a warm room.


I am now in the process of applying colour to each of these. I am using water thinned washes of daler-rowney acrylic inks and a synthetic sable brush to apply it with.


These will both printed as a varied open edition.


I have added both to my shop Borealart in Etsy if anyone is curious. The nice thing about prints is I can replace my sold ones easily as I will have a few of the edition in my print drawers ready to photograph and offer the art buying public.

Wednesday, July 29, 2015

back in the studio - solar plate experimentations and mix media applications


new   Solarplate with inked image ready for first printing

I finally found some time to be creative again in the studio.
After a very busy year with practically 100% of my time occupied as an arts educator in classrooms it is nice to be able to take ideas that have been on the back-burner and realize them.
I have jumped right back into intaglio process and I am translating sketches to plate based etchings.


I also recently gave a workshop in Solar plate printmaking in the community of Kenora Ontario. 
Kenora is located on the beautiful Lake of the Woods that shares borders with the Canadian provinces of Ontario and Manitoba as well as the northwest corner of Minnesota, our nearby US neighbour state. 
The next blog entry will focus on this adventure and showcase some of the wonderful results that participants created that weekend. I had to adapt some equipment for travel and that could be set up quickly on-site during workshops.

I wanted to feature in this post a bit of process and how I have adapted solar plate to my own intaglio printmaking endeavours.

Tip for working with UV sensitive materials

I have had to work in some dark conditions with ultra-violet spectrum sensitive materials. This meant working in an environment with very little light. However I learned that LED does not emit any UV. I purchased a couple of LED multi-light flashlights at the local Discount store. These came with a small magnet on the back in addition to a pop out plastic hanger. I was able to use them in my basement studio and found I could secure them to metal ductwork installed in a ceiling right over my working area as the magnet on the back has enough hold. 


LED flashlights attached to metal ducts via magnets


Exposure unit

First I want to feature the portable darkroom booth built with the purpose to house my home-made exposure unit. I constructed that unit a few years back to use for exposing the light sensitive plates to a source of UV light when sunlight wasn't an option.


portable exposure booth set up on top of a folding workmate shop bench. You can see my small Blick etching press that I have secured with woodscrews through a base mount board into the top of a box type cabinet I constructed for my studio.

Using a simple wood frame box I built in my workshop I mounted four black light units side by side to the underside of the lid in the interior of the box. I also left an additional area where I mounted a power bar beside the lights into which all four plug into. The box is set onto four 3" x  2" (7 x 5 cm) wood feet that elevate it to  4 inches (10 cm) above the base and this leaves working room to insert a plate, positive, small clamps and smooth edged plate glass underneath the banks of lights. I don't usually work with plates larger than 8  x10 inches (20 x 25 cm) in dimension (actually a lot smaller in most cases) and this provides plenty of exposure area for my plates.
The power bar cord runs out the side of the unit and I plug this into a nearby outlet. When I travel I bring along a 3 prong receptacle extension cord as one never knows where the nearest plug-in might be located.


Since I require an area with no influence of UV light until exposure I created a fold up booth made of recycled corrugated cardboard and a black fabric drape-over curtain. 
I attached black poster paper to the interior side of the cardboard sheets with double sided tape and also set a large piece of the black paper down on the table surface underneath the exposure box. I run a yard stick or two across to span across the top of the 3 sided walls of the booth and have the fabric drape cover as a ceiling and a drop down door for the front of the booth.

Plates are generally exposed with an aquatint screen first.  The very micro size dot aquatint screen works like a half-tone to create tonal variations and pick up fine details. Exposures are usually for a shorter duration than the exposure time required for artwork on film positive or a photo based image printed out in grayscale using an inkjet printer. Tip: I set the inkjet printer to print using a black ink only option. I have an Hewlitt-Packard printer). Some printers do not have this option for black ink only as I learned with an older Epson model. That used to create a blue black from mixing colours and my images did not expose very well. For solar plate purposes I have found that a true opaque black will yield the best results, either from inkjet cartridge or india ink on acetate,etc...


blacklights engaged inside the exposure box


a plate that already was developed being post-exposed to ultra-violet light from the blacklights mounted in the unit. The post exposure cures the polymer and hardens it so that it can be used over and over to produce prints on paper.


Artwork and creating a positive on film

I had a few sketches and photo references I made of tiny blue-eyed grass blossoms I had encountered on one of my nature walks here in the region last summer.

Using a pencil sketch on paper and overlaying a clear piece of Dura-lar wet media acetate I traced the sketch in pen and ink and added background using washes of Pelikan Tusche ink with brush and water dilution. The washes would add in an interesting background with textural elements.


pen and ink/tusche wash positive (left), original pencil sketch (right)


step one: the positive was exposed to a aquatint screen (30 seconds)

Step two: then the artwork (drawn line and tusche positive) was exposed to the plate for 1 minute.

Step Three: the plate was immersed into tepid water in a metal tray that had a piece of magnetic backing (like that found on a fridge magnet business card) to hold the plate steady. Using a soft bristle toothbrush and a back and forth scrubbing motion I gently removed the areas of polymer where I wanted the etch to happen.  I scrubbed my plate for about 1.5 minutes in duration.       

                                                                                                              The chemical reaction that occurs from blocking areas of the plate with opaque elements (artwork) during exposure is what allows those areas to etch in the surface of the polymer when it is scrubbed in a water bath.

Step Four: remove the plate from the bath. Blot the plate surface quickly with a piece of newsprint and then dry the plate surface with a short blast of warm air from a portable hand held hair-dryer.

Step Five: set the plate either under the exposure box or in the sun and let it post-expose for 5 to 10 minutes. This will harden the polymer and cure it making the etched lines and pitted areas permanent and ready for printing.

Step Six: apply ink to the plate as you would to a traditionally etched plate by wiping it into the surface so that the ink is contained in the below surface lines, wipe away excess ink off the surface. Start your printing process by putting dampened rag paper over top of the inked plate and then by passing the plate under the roller of an etching press print your plate.


top: pencil sketch (left) and ink positive (right)
bottom: inked plate (left) and print on rag from plate (right)

I decided to experiment and incorporate colour to one of prints using a film based monotype. The protective plastic film that covered the plate was re-used as a surface to paint on modified Akua intaglio inks. I had first peeled it off the unexposed solar plate and had set it aside. It was the exact same dimensions as the plate itself. I saw this as an opportunity to use as a surface to be used to create a colour monotype and print on paper then print the single colour plate over top.

Using a scrap piece of glass I lay down small swatches of ink that were each mixed with a drop of Akua blending medium. This made the inks more fluid.
I inked the plate first with carbon black ink (modified with a little mag mix powder to stiffen the ink). I set the plastic over top of the inked plate.
Using the inked plate as a guide and with a soft bristle taklon brush I painted thinned inks onto the surface of the plastic. 

Once I had all the areas painted I wanted this plastic plate was carefully removed. I placed the plastic plate face up on my press bed and set a piece of dampened rag paper over top. Setting my roller to light pressure I ran the plate and paper through the roller and was left with a undefined colour image.
I took the inked solar plate and using careful registration set it inked side down facing into the monotype. I very carefully flipped this over making sure that the plate didn't shift and set it down with the inked side facing upward on the press bed. The paper was laying over top. I brought down the felts and covered everything. I  adjusted the pressure of the roller to a tight squeeze for printing an intaglio plate and ran everything through the press again.


protective plastic peel-away film being used as a surface for creating a colour monotype using thinned Akua intaglio inks


close up of application of thinned Akua ink with brush onto clear plastic plate set on top of the inked solar plate


the monotype that resulted from application of modified inks onto the clear acetate film plate


the inked solar plate was carefully registered over the colour monotype image on the rag paper and printed into the monotype to add in the definition

Saturday, May 16, 2015

Mini print - a mix-media art project for elementary schools

I am commencing a project with a grade 5/6 classroom in a few days time. A few challenges have been presented for this project including the limited amount of time I will have to work with the students and small budget we have for materials.

I proposed an idea to the teacher to have his students create mix-media artwork using a simple intaglio printmaking technique (drypoint) and combining this with collage of thin coloured papers. 

As a multi-discipline visual artist the miniature size is something I have explored in the past and have had a few small prints included in miniature exhibitions both here in Canada and one in Denmark.


Superior
hand-coloured photogravure print
2005
plate size: 8 cm
varied open edition


I drew a simple landscape study of organic tree shapes. My idea was to incorporate colours and shapes through the collage application of thin asian colour tissue papers (known as chine-collé). My design is loosely based on a block print I created several years back titled Moon & Forest. 


Moon and Forest
block based relief print
image size: 10 cm x 10 cm


Due to the size of the plate this presented a challenge for incorporating very small pieces of the paper.
However it wasn't impossible and I am pleased with the results I have been getting using this.
Below is a short video I made from the intial simple sketch on paper through the scratching with the result linework in the surface of the plate. You will notice that placing the clear plate against a black background reveals the details rather nicely.


My plate is made from a flexible type of clear thin acrylic plastic that is used in the packaging industry. I was able to place my pencil sketch underneath and view it through the plastic. Using a sharp needle point tool I basically traced my sketch into the surface using scratching strokes.
Akua intaglio carbon black ink was wiped into the scratch marks and then using wiping fabric (a thin web-type material I sourced from a local fabric shop) I removed excess ink from the surface of the plate. A piece of thin paper (old yellow pages from a phone book) was pressed and rubbed using a circular motion to remove additional surface ink. This is the same process many printmakers use when inking a plate (etching) in preparation for printing.

First I made one test print on rag paper using just the black ink to show me how the scratch line would reproduce. Akua intaglio ink was used and I added a little bit of mag-mix (magnesium carbonate powder) to thicken the rather runny ink (which is vegetable oil based).


I used the plate edges as a guide to trim the small pieces of asian paper to the same dimensions as the plate. The tricky part was then to determine where each piece would be placed. I put the plate (ink side) facing upwards on the press bed. I carefully placed the tissue thin paper on top and moved it into place using the point of an x-acto blade. A fine mist of water was sprayed onto the plate surface to slightly dampen the tissue. A fine dusting of wheat paste powder (strained through cheesecloth stretched over the opening of the jar it was in) was applied. 
Finally I set a slightly moist piece of  250 gm rag printmaking paper over top.
A piece of newsprint was put over top and then the three layers of wool felts were carefully lowered over top of everything, I manually turned the press handles and passed the plate, papers and blankets underneath the top roller which I had set earlier to produce a fairly tight squeeze. 

The pressure forced both the tissue thin asian paper on top of the plate and the rag down into the areas holding the ink. This left the ink on the surface of the colour papers and the pressure fused these with the fine layer of adhesive onto the rag paper. It allowed me to incorporate colour and texture through the simple application of collage. So far I have produced 3 test prints. Two of these use the collage application. You will notice in one I carefully cut out a circular shape to allow me to have a moon behind the tree.


This artistic endeavour in the classroom should prove to be both exciting and challenging for the grade five and six students. I will follow up on this post soon with photos of what they have been producing.


Friday, October 3, 2014

Photo based polymer plate etching - small format


Single colour (black ink) print on white rag paper. Plate size is 8.25 x 10 cm (3.25 x 4 inches).                     Hand colouring will be added later to the image

I am currently translating a handful of photographs that I have taken over the past couple of years to intaglio prints on paper. This is part of my Small Wonders of the Boreal series of studies that examine flora and fauna of the region.

I am adapting the photos onto a thin light sensitive solar plates. I have cut the plates to a variety of small rectangles and squares that fall into the classification of miniature. First thing I do is resize my original photos (stored digitally on my pc) and using photo editing software convert this to grayscale. This is then printed onto a high quality inkjet transparency sheet using the grayscale (black ink only) setting and at 600 dpi. I call this transparency in grayscale a positive. The concept is simple. The ink printed from the inkjet printer creates opaque areas on the clear film. These will block out UV light and no chemical reaction will occur in the light sensitive polymer where it cannot penetrate. The polymer will be able to be removed from these areas using water and some scrubbing.


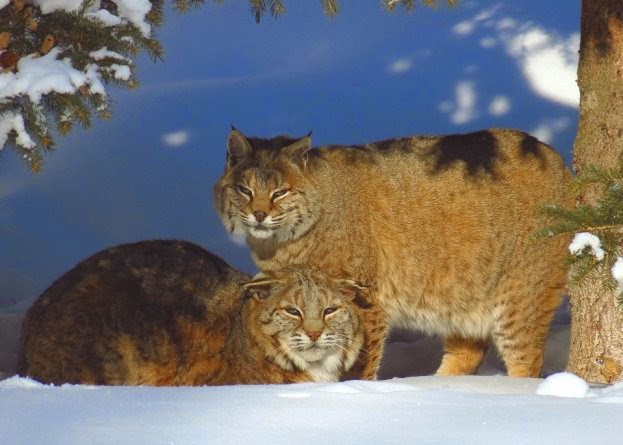
the original colour photo that I took of a pair of Bobcats in the winter snow


The plate has a very fine aquatint screen pre-exposed for a couple of minutes to the surface using an ultraviolet light source (ie. sunlight or articficially created from aquarium lighting). This is followed by a 3 min. exposure of the positive. The plate is developed using lukewarm water in a pan and gentle scrubbing with a soft bristle toothbrush. I then re-expose the plate to the UV light for about 10 min to harden the polymer and make it permanent.

I applied Caligo safewash carbon black to the plate and wiped it back with a bundle of tartalan fabric. Then I polished the surface using yellow pages from an old phone book. A piece of Canson Ed. 250 gm white rag was presoaked and blotted. The inked plate was printed onto the paper using my small hand turned etching press.

The next step will be to apply colouring into the print once the ink has fully dried (perhaps a week from now).


Sunday, May 4, 2014

Elementary School art - Drypoint and wet media application


 drypoint hand-coloured with watercolour


the Sleeping Giant


nightmarish landscape


urban landscape


 aquatic landscape


 I recently worked with a grade six class and the first of two print based projects we undertook was creating images from acrylic plates using a method known simply as drypoint. To further enhance the prints watercolour was added after the ink used for the prints was allowed to dry. The best way to introduce any technique is to give an actual hands on demo. I also give students tiny sample pieces of plates and blocks. This way they become familiar with the tools and surface ahead of progressing to the main project. We also usually take some time to discuss the project and break potential subject matter for studies into the form of sub-categories from a chosen theme.


Step #1 - drawing 

Students drew a rough sketch on paper to the plate size. Because the thin acrylic plates are clear the sketch can be set underneath and used as a guide for scoring line into the plastic surface using an etching needle.


sketch and plate secured over top using pieces of masking tape


Students were given a preliminary lesson first on drawing techniques and composition. I demonstrate a few ways to incorporate textural elements to their plates including spacing of linear elements, stipple, cross-hatch, lightly roughing the surface with sand paper. The idea was first to produce line of different weight and depth into the plate. This would translate as thin light or heavy dark when ink was applied and the plate was printed. The same would apply for texture depending on the amount of texture added. 

Step #2 - scoring the plate using the sketch as the guide


scoring the surface by scratching with a sharp needle point.
The tools were constructed by drilling a small hole into the end of a 1/4 inch wood dowel. I then inserted a stainless steel darning needle (a bit of masking tape was wrapped around the end to stabilize the needle.)


this technique requires patience and frequent rest breaks from the scratching process


setting a piece of dark paper between the sketch and the plate 
helps to reveal what has been scratched into the plate surface.


Step #3 - application of ink and printing

For this project vegetable based Akua intaglio inks were used. These are non-toxic and stay workable and open like traditional oil but without the odor. But the real bonus is that they clean up easily with detergent and warm water.
Students apply the ink using old used soft bristle toothbrushes to get the ink down into the lower recessed line in the plate surface. This is followed by wiping the surface of the plate using a mesh type interfacing material (found at most fabric shops). Then a final polish of the plate surface is made using clean tissue type paper and the palm of ones hand (the type of tissue that used for examination tables in medical clinics).

Pre-moistened rag paper is set over top of the plate which is placed on top of a press bed. Newsprint is set over top of the paper and then the wool felts are placed over this. The press handles are turned which in effect passes the plate, paper and blankets under the large metal press roller (preset for a specific height and tightness beforehand). When the bed is on the opposite side the blankets are lifted and the paper is very carefully lifted to reveal the print on paper. The extreme pressure has forced the softened fibers of the paper (from the dampening beforehand) down into the lower scored inked areas which effectively transfers this to the paper. The plate also leaves a slight embossment in the paper around the edges. 

plate and paper after passing through the roller of the press


the moment of truth


paint application