Showing posts with label water based ink. Show all posts

Thursday, February 7, 2019

First new artwork in a while - rework of an older piece

Near Rossport along Lake Superior - 2019
four block relief print (7 colours)
image size: 15 x 20 cm ( 6 x 8 inches)


                                      My apologies to followers of this blog. It has been nearly six months since my last blog entry. I am still dealing with health related challenges and there are limitations in the scope of what I am able to do and for what length of time. However my creativity has not been stifled and I am making it a point to keep the proverbial creative fires stoked.


One way was to return to an old image and produce from it again with slightly different elements. I found an older block of mine that was carved back in 2007. The small edition six colour print originated from one carved linoleum block (key image) and three thin pieces of stryofoam mounted onto mat board plates. The shapes were drawn into, cut and mounted carefully on their supports. 
Prints were made by passing the blocks and paper under a roller (with set pressure) on my small tabletop etching press. However over time from multiple passings the styrofoam quicky deteriorated and cracked.


progress proof before some minor additions


I decided that a new version could be printed this time around by replacing the styrofoam with carved raised linoleum elements. There have been some changes in terms of water, and a mid background landform.
This was also an opportunity to use Graphic Chemical water based relief printing ink. The ink is very sticky (but keeps open on the glass slab for a day or two). It is not oil based ink but the base that suspends the colour pigments is derived from plant sources. Once printed onto an absorbent paper surface it dries quickly (a few hours in the right studio conditions.)

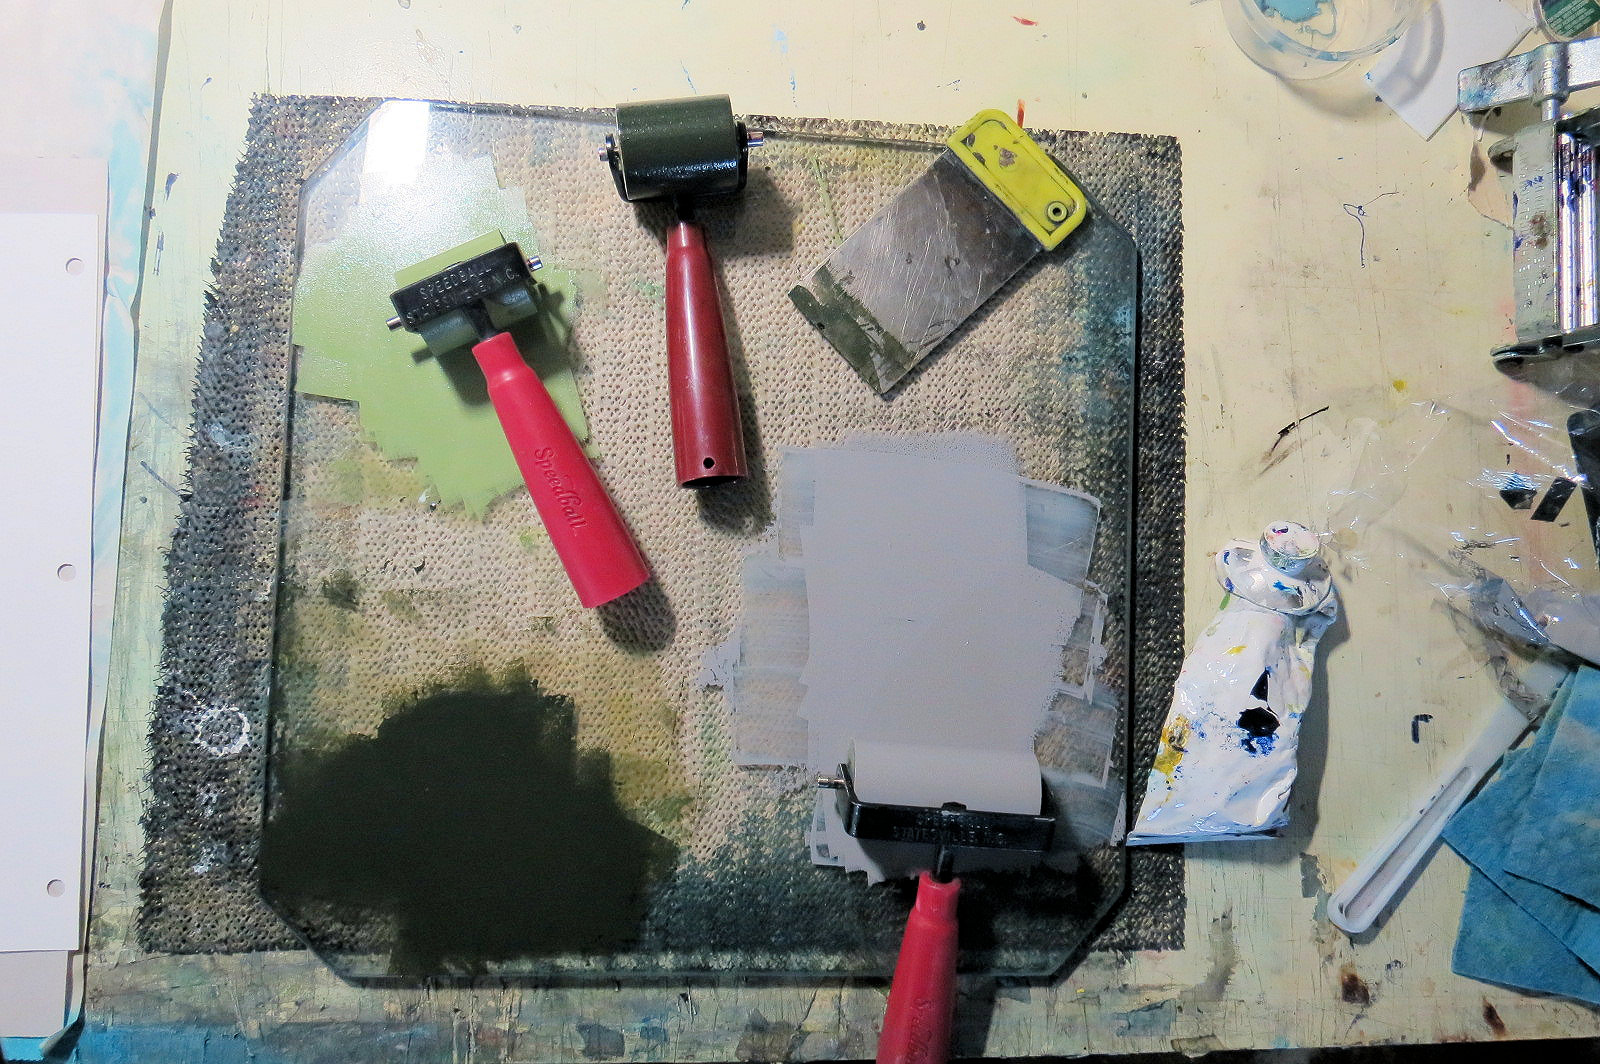
Tempered glass inking plate with Graphic Chemical water based relief printing inks and two sizes of rubber brayers.


Four blocks in total were used. Two blocks had separate pieces of lino cut apart that were glued onto an equal size substrate. Since some elements had separation between them I was able to use one block to print 3 colour elements in a single pass. Small brayers allowed me to apply ink to the raised lino shapes. The first block that created the water and sky used a blend of inks rolled out on the glass. I put two small dollops of different tones of blue and then a bit of white ink beside the lighter blue.


A registration board system was used that had a 3 hole punch to hold the paper in place and also an area that the blocks of equal size could be held steady and would line up when printed in layers.


progression from block #1 - blend of blues and white followed by the layer of ink from block #2 far dusty blue-teal landform


Monday, September 3, 2012

Summer inspired sunsets - block prints

Sunset
2012
four colour block relief print
varied open edition

I recently found the four blocks from a linocut I created back in 2006. This was inspired by the wonderful oil studies painted in the early part of the 20th century by Canadian Tom Thomson (who was the inspiration behind the formation of the Group of 7).
Below is an example of one of Thompsons famous sunsets from an evening here in Ontario, most likely from his time spent canoing and camping in Algonquin Park in the central part of the province.


Sunset
oil
1915
Tom Thomson

ã National Gallery of Canada

 Ottawa ON

At that time I printed a small run of an open edition using Speedball water based ink onto Stonehenge machine made rag paper.
This time around I have been experimenting on Awagami fine art bamboo rag and using Graphic Chemical water base relief printing ink (pigment is binded from food grade glycol).
I really like the open air time factor with the inks and that fact that they dry literally to touch within a few hours once they are absorbed by the paper surface. These are the same inks I have been using exclusively the past year in schools since they are easily washed up with warm water and liquid soap.
The blocks have been printed using my three hole punch registration system on my small press. I set a piece of book binding board over top of the paper on the inked block and this provides an nice even pressure to make good contact with the two surfaces. I haven't used damp paper and ink transfer has been fairly even. I am however adding a little extender to the second & third block inks to create a little transparency effect in the cloud shapes. (more visible in the second photo example)


Tuesday, January 25, 2011

Elementary School printmaking instruction

I have been active the past month in the role as an arts educator visiting grade five classes in a couple of elementary school classrooms here in the city of Thunder Bay.
This is through the Community Arts and Heritage Education Project or CAHEP. I have been actively getting placements in schools through this program since 2006.
This year the learners have been given the opportunity to learn relief block printmaking. Not only do they get to try a brand new visual arts technique but learn about the principles of design and explore colour theory in the process. This years theme for the program is Thinking Outside the Box.
Here is the Project Overview for the second and most recent venture:

Project Title: Construction

This project uses relief block printmaking as the basis for the creation of hand printed imagery that utilizes several stages of process from start to finish.
Learners were given the opportunity to use two surfaces to create a two colour print on paper.
One surface was left solid and the second surface was carved into using special cutting blades to produce a relief design. Prints were produced by using careful registration of paper and application of ink to both sides of a block in two separate printing sessions.
To begin, the learners were encouraged to think about and share dialogue revolving around the concept of the word structure. Using photo reference they focused on a particular section of either a manmade or nature made structure. They enlarged the chosen area and proceeded to develop it and construct a colour print that would allow it to be viewed in an entirely different way.
This is where adhering to the theme of “thinking outside of the box” came into play.
Learners were also challenged by utilizing the principles of design in their respective works of art. During the project they learned about such important areas such as line, shape, positive and negative space, rhythm, repetition, texture, composition, contrast to name but a few.
Using linoleum cutting tools they were able to carve their images into a soft composite material (softoleum).  Ink was applied to the relief surfaces using brayers and prints were made in two colour combinations on paper using traditional hand printing methods.
An emphasis was made on using complementary and split complementary colour combinations in the prints that would allow for real contrasts and impact in the images.
The students printed a solid colour square first and then the cut side of the block with their design was printed over top in a contrasting colour.

Materials used:
Softoleum blocks, linocutting tools, water based printing inks, soft rubber brayers, registration
boards, subi printmaking paper, rubbing sticks, spray adhesive, white foamcore board panels, spray adhesive

Individual panels contain 6 prints are stacked vertically with an overall measurement 25.4 cm (10 inches) in width by 101.6 cm (40 inches in height).
Each image explores the concept of structure in two colours.

The finished results have been very good. I have put together a display module where an equal number of prints (6) are affixed to a foamboard panel in a vertical format. Four of the panels will be hinged together into a four sided column and set on a table to allow for 360 degree viewing.
The results of these sessions will be presented to the public in a day in Feb. at a Community based Arts Fiesta held annually in our local auditorium. Then the works will continue as a display in a public space such as an art gallery or other public accesible space for a longer duration through the month of March.
Below are some photos that were taken during different stages of the projects.

cutting the softoleum using linocutters
 reference for the drawing on the block is from a colour rough sketch

water based Speedball inks applied to the block using a rubber brayer
that was rolled out onto brayer from plate glass surface


registration of block on simple cardboard with foamboard strip taped on top.
The paper is held in place with push pins and the paper is set over the inked block
and burnished using a plastic rubbing stick using constant pressure in a circular motion.


back to back prints hung to dry on a clothes line.
One of several stations set up for application of different colours of inks to the blocks.


zig zag design - orange printed over top of a solid violet square

detail from square print panel - spiral shell design printed in green over red (complementary colours)


another detail from a print panel
spider web study - yellow over top of a solid red square

four panels each with six prints that will be hinged together to create a four sided column display 
Each  print is 14 x 14.6 cm (5.5 x 5.75 inches) and there are a total of 24 prints in total. 
.

Monday, January 24, 2011

Overcoming problems in relief printmaking when using water based inks

Recently in the printmaking forum at WetCanvas some artists new to relief printing posted inquiries about problems they had been experiencing. I thought it might be good to share in my blog some of the advice that was given so anyone who might read this journal entry could also use this information to help them.

There seem to be a lot of problems printers experience while working with water soluble inks that are pigment based bound together with gum arabic. I am talking primarily with some brands under names such as Speedball, Daler-Rowley, Ocaldo, Demco (Canadian made). These types of ink can dry very quickly on the inking slab, brayer, block surface if the enviromental conditions are too extreme caused by heat or direct sunlight. Another problem is working with them when the temperature is too cold as they will not behave the way they should for application. The ink will sometimes not grip the brayer surface or apply well to the block surface either.
If it is warm and dry where you are doing your printing you could add a small amount of retarder to your ink. Speedball manufacture such a product and also they make a clear medium extender.
As for working in the cold, your best bet is to print in a space at room temperature.
You may want to make sure that your brayer (roller) is totally free of any residue from past use (especially if it may have seen oil based inks used on it). Water soluble ink picks up best on a clean smooth surface. I personally tend to favor using a soft rubber brayer but to each his own.

Another factor may be the surface of the block itself. Is there any residues on the surface that could act as a resist against water soluble inks?
Might try wiping with soft cotton cloth and denatured alcohol or you could also lightly sand the surface of the block using an extra fine grit paper or sanding sponge.

The ink should be rolled out on your glass into a thin even mass and picked up by the brayer again to allow a thin even coating on your block surface. Ink application is best achieved by rolling it in different directions across the surface. You can tell if there is a even shine across the entire surface but also you shouldn't see marks where heavier and lighter ink layers overlap.

Paper is another important factor to consider. If you are applying hand burnishing to transfer the ink to the paper you want an absorbant paper surface but also the paper should not be too thick.

Here is a list of lighter weight papers that are suitable for printmaking and I have provided links to some of the major retailers online who sell these. GSM refers to the weight of the paper in grams squared). Generally anything higher than 200 gsm might require the use of a press to give you the best results due to the thickness of the paper. The ones listed shouldn't require a great deal of hand pressure. These are also suitable for oil based relief printing off a block surface including those using linoluem, wood, resingrave, styrofoam, softoluem, easykut, speedykut, plaster relief, etc...

Magnani Revere book weight (175 & 120 gsm)
http://www.danielsmith.com/Item--i-G-540-610

Canson Johannot book weight (120 gsm)
http://www.dickblick.com/products/ca...not-art-paper/

Zerkall Frankfurt (120 gsm)
http://www.dickblick.com/products/frankfurt-paper/

St. Armand old master (80 gsm)
this mill based in Montreal makes paper in the old world tradition and although I have never tried their Old master drawing paper it is recommended for letterpress and judging by the weight would lend itself to relief printing I suspect?
http://www.st-armand.com/English/E02d-Drawing.php

Arches Text weight (120 gsm)
https://www.graphicchemical.com/shop...t=Arches+Text+

Somerset text weight (120 gsm)
https://www.graphicchemical.com/shop...et+Text+L aid

Zerkall book vellum (145 gsm)
https://www.graphicchemical.com/shop...catalogid=3697

Zerkall Nideggen (120 gsm)
https://www.graphicchemical.com/shop...9&cat=Nideggen

Somerset book (175 gsm)
https://www.graphicchemical.com/shop...=Somerset+Book

Gutenberg (various weights)
https://www.graphicchemical.com/shop...&cat=Gutenberg

Arturo (!20 gsm)
https://www.graphicchemical.com/shop...309&cat=Arturo

Rives Lightweight Paper 115 gsm
http://www.danielsmith.com/Item--i-G-285-620LW

Mohawk Superfine 120 gsm
http://www.danielsmith.com/Item--i-G-215-010

Velin Arches (Arches text weight) 120 gsm
http://www.danielsmith.com/Item--i-159-390-001

Hosho
http://www.dickblick.com/products/hosho-paper/

Mulberry
http://www.dickblick.com/products/bl...rinting-packs/

Masa (77 gsm)
https://www.graphicchemical.com/shop...d=351&cat=Masa

Kitikata (30 gsm)
https://www.graphicchemical.com/shop...4&cat=Kitakata

I will also mention a retailer based in Toronto Canada who have a fairly extensive array of Oriental made papers worth checking out. The Paper Place on Queen St. W are one of the best sources here in Canada I have found. I believe they also ship worldwide.

Another thing to try is a slight misting of the paper before burnishing. Not too much though since you don't want bleeding of the ink to occur. The slight dampness of the paper surface can also aid a better pick up of the ink onto the paper.
When burnishing the back of your print paper you might want to place a sheet of wax paper, acetate or glassine in between the burnishing tool and the paper. This helps to prevent possible damage to the print paper and also helps the movement of the burnishing tool across the block surface located underneath the print paper.

Saturday, November 14, 2009

A combination of relief and intaglio


This new print was born from the combination of two techniques and used one linoleum block. It is a study of the patterns found on the surface of water (in a bit of an abstract presentation). Basically what I did was wipe and force a water soluble oil ink (prussian blue) into the cut recesses of the block. The flat surface relief had a layer of light cerulean blue linseed oil ink rolled onto the surface with a brayer.

I soaked a piece of heavier white cotton rag paper and then blotted it between an old cotton towel. Setting my top roller for moderate pressure on the etching press I put felt blankets and newsprint overtop of the print paper (which was set on top of the block) and ran it under the roller. This pushed the damp paper down into the recessed areas and also picked up the ink from the surface. Some of the deepest areas of cutting did not get ink into them so they printed as slivers of white which add to the play of light on the surface of the water.

Thursday, April 30, 2009

landscape - demonstration print for teaching relief block


Lake Superior shoreline study
five colour working proof print
speedball w/s ink on subi block paper
printed using hand burnishing


I am starting a classroom based printmaking project next week in a elementary school about an hour east of Thunder Bay. The students will learn to create several multiple colour relief block studies based on landscapes of the region.
The print pictured above is a piece that was created specially for this project. It is a study of rocky shore along Lake Superior. Will be using it as an example to show how to print a landscape using a combination of different types of relief surfaces (softoleum and scratchfoam in this case). It also illustrates how one can layer colours from different relief block surfaces to build an image.

Fig. 1 shows the initial pencil sketch which was scaled down to fit the softoleum block which became my master or "key" block.
fig. 1

fig. 2
Figure 2 shows the colour layout that I did in marker. This will serve as my guide for mixing my ink colours when the blocks are carved and ready for printing.
In figure 3 I have cut away the surface of a piece of softoleum with linocut knives. First I coated the surface using black permanent marker and then using my sketch as a reference I redrew the image on the black surface using a silver gel pen. The light silver colour lines and shaded areas were cut away to leave the surface areas that would determine the relief when it is printed using black ink. This material cuts very easily so I had to just lightly dig in with the tool tips to remove it. I wanted to create a bit of depth from the lower section so I went over that later with a larger U gouge blade to remove more of the rubber like material.


fig. 3

Fig. 4 is an example of a simple registration system for printing. One important observation I made is for exact registration the block height and horizontal level that the paper rests on the block should be about the same distance. Any variance in height can cause a slight misregistration when printing. To allow my paper to lay horizontally level on the 3/8 inch thick softoleum keyblock I found that a strip of 1/4 inch foamboard with a strip of matboard on top of this created a header bar to which I could pin my paper at the top of the registration board. What I did was tape this header bar to the top edge of a baseboard (cardboard). I also cut the baseboard to be the same size as that of the paper which is 23 x 30.5 cm (9 x 12 inches.) The paper was secured by applying four evenly spaced thumb tacks pushed through the paper into the foam strip underneath.


fig. 4

The blocks were secured in place for printing on the registration board by first centering the key block then taping strips of matboard around the sides and along the bottom edge. The additional blocks which were the same size as the key block fit into this U shaped brace. The paper was placed over top of the inked block, hand burnished and then carefully folded back and held down wiith one hand while I removed the block. Then you can remove the tacks and hang the print to dry until ready to print the next colour in which you match up the pin holes in the paper with the foam strip (the thumb tacks will fall into place easily when you find them.
A tip is to make a black dot by using a marker point around the pin hole on the foam strip. These dots can usually be seen through the paper. This helps to relocate the depressions in the foam where the tack points will depress when reattaching the paper to the board.

Fig. 5 illustrates several colours on the paper printed from the styrofoam (scratchfoam) sheets.
Sheets of scratchfoam were glued onto both sides of a piece of foamboard. First of all it made the block the same height as the softoleum block. The second benefit is that it also allows both sides of the block to be used.


fig. 5