Showing posts with label Cranfield Safewash oil inks. Show all posts

Friday, February 7, 2025

drypoint explorations

Exploring along the rocks
dry point print with hand colouring
2024
artist proof 


Luna Moth
drypoint
2025


working on copper for the first time, plate progress so far


The past couple of months I have been spending time focusing on the creation of more drypoint based prints, using both unconventional and traditional surfaces to draw into using etching needles and blades.

The print with the red fox was made from a square shape plate cut from tetra-pak packaging. It was cut from the front panel from a larger than juice box sized container that was originally used for keeping coffee in. The shiny silver interior surface is the side that is used. I realized that the thin plate could be problematic getting ink transfer during printing. A fellow printmaker suggested the plate could be attached onto a mount board. The plate was spray adhesive mounted onto an equal size piece of scrap mat board I have saved in a tote.

I made the drawing in fine line marker on the surface of the plate (by looking at the original pencil sketch I had made and repeating the image sketching freehand. I didn't put in fine detail though at this initial stage. I first wanted to get main shapes established then work in and out from these regions of the image.

 I then not only over the fine marker line with the drypoint needle but also started doing the detailing with a diamond tip needle and another I made from a this small sewing needle with an attached handle.


drawing on plate (reverse image) made visible
by wiping akua ink into the lines


progression with drypoint marking and then etching ink
was wiped into the recessed line


first proof on paper 


Luna Moth began as a sketch on paper that I then set under a thin piece of  2mm clear acrylic sheet and used as a guide for incising the surface with drypoint needles and tip of a scalpel and x-acto blade. It was printed on 250 gm white rag with Cranfield Safewash carbon black ink. 


At the present time I have been doing transfer of a fine point marker study in my coil sketchbook onto the surface of a small polished copper plate. Copper is new to me. My experience back in intaglio etching class in art college was with zinc plate. I am enjoying the process and have been using a very small scrap piece to practice and refine the drypoint markings I would like to use.


I will follow up this post again soon with photos and observations when I have printed the plate. 

Monday, March 1, 2021

more dry point from acrylic plate

Kayak on shore, drypoint 2021 


Recently a friend of mine and I were talking about kayaking. 

Our conversation led me to reminisce about a few outings I had made in a kayak not so long ago. I remembered there were a few photos taken during my excursions that had been kept on file. I thought maybe it was time to incorporate the subject into some type of art work. I made a quick sketch while looking at one photo of the kayak I had been using at that time. I also looked at a few landscapes and waterway photos.


rough sketch in pencil


I had a small piece of 2mm thick clear acrylic plate (framing plexiglass) and decided to take the sketch and configure it to create a small dry point study on the surface of that plate. To achieve this I first scanned the original sketch and with the graphics editing program I use (Corel draw) resized this to fit the dimensions of the plate (2.75 x 4 inch rectangle).

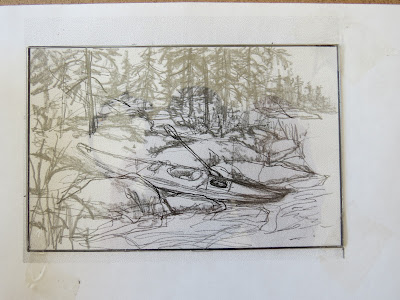
On the reduction size inkjet print out of the sketch I then added more elements in pencil that would define more trees, rocks and such. The plate was set over top of the sketch and taped in place (with tabs of clear cellophane in the corners to anchor it to my drawing board). I set this underneath a lit magnification swing-arm lamp and started working the surface (with the sketch underneath as my guide). I used a variety of sharp tip needle tools to achieve this. 


clear acrylic plate set over top of inkjet reduction print
that has more details added in pencil


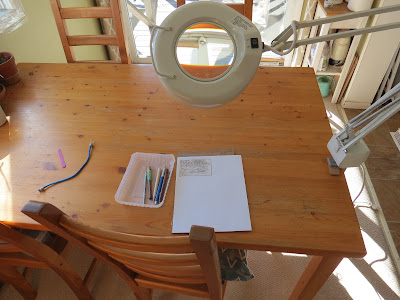
the area and table where I do my preliminary work before printing 


tools for drypoint - one is repurposed (the retractable
mechanical pencil lead holder with compass needle point).
The light wood dowel contains a darning needle
(countersunk in a small drilled hole in the end.)


detail of scratch into the surface of the plate


The composition was altered with a needle instead of a pencil and on a plastic surface instead of paper. I added fine dot by creating areas of stiple marks in the surface using fast repeated pocking with the mechanical pencil anchored needle tip.

The plate edge was then beveled to a 45 degree angle with a shop file and the corners of the plate were also slightly rounded.

I applied Cranfield Safewash carbon black ink with a rolled felt dabber and wiped this back with a softer web type fabric (instead of tartalan cloth which would have left fine surface scratch marks in the acrylic. I immersed a few pieces of 250 gm cotton rag into water then blotted them with cotton towels and set them between newsprint.


plate reversed (inked side on the bottom of plate)
after first proof pulled on paper with press


first proof - notice how the ink prints darker tone in areas 
around shoreline rocks and in the trees due to the burr from
the plate surface.


the third print from the plate. Less contrast and gentler wiping
reveals more of the line and dot work.