Showing posts with label drypoint. Show all posts

Saturday, August 23, 2025

detailed drypoint landscape study


It has been a sad summer where I have had to take a break from the studio due to a terminal illness diagnosis that my aged mother was given in July. Unfortunately the illness took on a very aggressive acceleration soon after and I travelled a 1000 km and arrived in time to spend several days with her before her passing. I decided to stay longer to care for my surviving father until the family can resettle him in an assisted living facility in the same community as three of my siblings.

Just before I had to travel for all of this I did spend time in the studio and was able to produce around 20 drypoint prints on paper of a landscape study I had sketched earlier. 

The scene depicted is from my roamings to some locations along Lake Superior about four hours east of where I reside. This is where there is a pristine national park here in Canada on Lake Superior called Pukaskwa. The study is from a cove along the shore of the park that is dotted with inlets and small islands.

The printed image size is 10mx 13.5 cm and I used a thin acrylic plate to scribe the lines using a homemade needle (math set  compass needle tip set into a mechanical pencil holder.) Plate tone and careful removal of mix of prussian blue safewash with a little carbon black ink using tissue and cotton swab was utilized to create the dramatic sky.

In the meantime I told the director of the Hospice that took care of my mother I would donate a framed work to display in their facility in honour of her. The work is in development at present and my plans are for it to be a large drypoint combined with a monoprint background.


Friday, February 7, 2025

drypoint explorations

Exploring along the rocks
dry point print with hand colouring
2024
artist proof 


Luna Moth
drypoint
2025


working on copper for the first time, plate progress so far


The past couple of months I have been spending time focusing on the creation of more drypoint based prints, using both unconventional and traditional surfaces to draw into using etching needles and blades.

The print with the red fox was made from a square shape plate cut from tetra-pak packaging. It was cut from the front panel from a larger than juice box sized container that was originally used for keeping coffee in. The shiny silver interior surface is the side that is used. I realized that the thin plate could be problematic getting ink transfer during printing. A fellow printmaker suggested the plate could be attached onto a mount board. The plate was spray adhesive mounted onto an equal size piece of scrap mat board I have saved in a tote.

I made the drawing in fine line marker on the surface of the plate (by looking at the original pencil sketch I had made and repeating the image sketching freehand. I didn't put in fine detail though at this initial stage. I first wanted to get main shapes established then work in and out from these regions of the image.

 I then not only over the fine marker line with the drypoint needle but also started doing the detailing with a diamond tip needle and another I made from a this small sewing needle with an attached handle.


drawing on plate (reverse image) made visible
by wiping akua ink into the lines


progression with drypoint marking and then etching ink
was wiped into the recessed line


first proof on paper 


Luna Moth began as a sketch on paper that I then set under a thin piece of  2mm clear acrylic sheet and used as a guide for incising the surface with drypoint needles and tip of a scalpel and x-acto blade. It was printed on 250 gm white rag with Cranfield Safewash carbon black ink. 


At the present time I have been doing transfer of a fine point marker study in my coil sketchbook onto the surface of a small polished copper plate. Copper is new to me. My experience back in intaglio etching class in art college was with zinc plate. I am enjoying the process and have been using a very small scrap piece to practice and refine the drypoint markings I would like to use.


I will follow up this post again soon with photos and observations when I have printed the plate. 

Saturday, June 1, 2024

kayaking theme - drypoint


Kayaking
drypoint with additional hand colouring
9 x 9.5 cm
2024
edition size of 20


Above is pictured a new work which again explores a activity that is near and dear to me, that being kayaking and also canoeing.

It is a study of the relationship between the paddler and their surroundings and the view you might experience from out on the water.

I used a square piece of thin acrylic plate (it is used for covering art in frames instead of heavier glass) and the thickness is about half of what standard plexiglass (perspex for you followers of my blog from outside N. America). I cut the plate myself using a special cutting knife used to score and snap plastic. I then very carefully filed the edges to a 45 degree bevel (using a moderately toothy file) and then ran a piece of extra fine emery nail file to remove any striations in the bevel left by the metal file.

The surface markings on the plate were a combination of direct line drawing and textural dot detailing created using stiple of the etching needle tip (most apparent in the foreground). 

I wiped the plate using Cranfield safewash carbon black relief printing ink. The work was printed onto a piece of 250 gm Arches white rag using an etching press with felt blankets and manually advancing the press bed with the plate and paper under the pressure of the set top roller.


print on paper just off press bed post-printing


Friday, May 27, 2022

Experiment - small tetra-pak plate intaglio print

small botanical print made from a Tetra-pak plate


Several years back I came across a blog by a European printmaker who was making original intaglio prints using tetra-pak juice boxes. These containers are originally used to contain liquid foods. The boxes are constructed from paper board with a thin foil layer fused onto one side and then are coated in a thin layer of plastic. This artist was cutting panels from used containers and using these as a surface from which small hand-printed intaglio prints could be achieved. She had success marking line into the surface using needle tools. These lines would hold etching ink and would transfer to paper under extreme pressure (usually with the use of an etching press).

I recently decided to try this material out for myself, being a bit of tetra pak containers find use in this household. It was also an experiment to learn how the plate might perform printed as small detailed images. The artist who inspired me had minimal detail in her print designs and areas of dark contrast achieved by cutting and peeling away areas of surface layer. She added some line and texture in the remaining surface using a pottery needle to scribe line.

I had a sketch on hand that was recently used for a larger acrylic painting on board. I redrew my sketch onto tracing vellum (reduced scale) to fit a small plate that measures 5.5 x 8 cm (2 1/8 x 3 1/8 inches) and then reversed it and retraced the line using a 6B lead pencil. This was then positioned (6B graphite tracing facing the plate surface) over top of the tetra-pak plate and secured it with cellophane tape to the underside of the plate. I then drew over the graphite line with a fine line permanent marker. The next stage was to remove surface areas where the darkest tones (created by the ink deposits in the lower regions) would be printed.

tracing from sketch, front and back of cut panels from juice box


cutting and peeling away surface foil area using surgical scalpel blade


I carefully used a surgical scalpel to cut and remove the delicate surface area where I wanted darkest hues to print. Peeling away the plastic coated foil from the cut surface areas revealed a coarse paper board texture. This might hold a fair bit of ink which in turn would print dark after the wiping back of the plate before I printed it onto a soaked and blotted cotton rag paper.

plate ready to be printed after inking and wiping surface with newsprint


first print that ink was too spotty and weak


the second print


I applied Caligo safe-wash black etching ink again using a homemade rolled felt dabber and wiped the surface with yellow pages from an old phone book. The ready to print plate was then put on my press bed on a registration sheet, clean cotton rag paper was set over top along with an equal size piece of newsprint and then the felt blankets. I set my press roller to deliver tight pressure when the bed was passed under the metal top roller.

Unfortunately print #1 didn't yield a good image. The ink was faint in a lot of spots. Could have been any number of factors that caused this (too much wiping, ink too thin, paper too damp, etc...). 

After some modifications and a second inking of the plate results for the second print were better. There was some good contrast happening between dark and light areas. However that being said a lot of the tiny lines that were scribed into the surface didn't appear to deliver the details I was hoping for. I believe that the small size of the plate and the shallower surface marks made by the tools didn't deliver as good an image as those from a metal or plastic plate. None the less, I still see possibilities with tetra pak prints of small size maybe using designs with basic outlines and simplistic detail lines. I plan to explore this again soon.  


Monday, March 1, 2021

more dry point from acrylic plate

Kayak on shore, drypoint 2021 


Recently a friend of mine and I were talking about kayaking. 

Our conversation led me to reminisce about a few outings I had made in a kayak not so long ago. I remembered there were a few photos taken during my excursions that had been kept on file. I thought maybe it was time to incorporate the subject into some type of art work. I made a quick sketch while looking at one photo of the kayak I had been using at that time. I also looked at a few landscapes and waterway photos.


rough sketch in pencil


I had a small piece of 2mm thick clear acrylic plate (framing plexiglass) and decided to take the sketch and configure it to create a small dry point study on the surface of that plate. To achieve this I first scanned the original sketch and with the graphics editing program I use (Corel draw) resized this to fit the dimensions of the plate (2.75 x 4 inch rectangle).

On the reduction size inkjet print out of the sketch I then added more elements in pencil that would define more trees, rocks and such. The plate was set over top of the sketch and taped in place (with tabs of clear cellophane in the corners to anchor it to my drawing board). I set this underneath a lit magnification swing-arm lamp and started working the surface (with the sketch underneath as my guide). I used a variety of sharp tip needle tools to achieve this. 


clear acrylic plate set over top of inkjet reduction print
that has more details added in pencil


the area and table where I do my preliminary work before printing 


tools for drypoint - one is repurposed (the retractable
mechanical pencil lead holder with compass needle point).
The light wood dowel contains a darning needle
(countersunk in a small drilled hole in the end.)


detail of scratch into the surface of the plate


The composition was altered with a needle instead of a pencil and on a plastic surface instead of paper. I added fine dot by creating areas of stiple marks in the surface using fast repeated pocking with the mechanical pencil anchored needle tip.

The plate edge was then beveled to a 45 degree angle with a shop file and the corners of the plate were also slightly rounded.

I applied Cranfield Safewash carbon black ink with a rolled felt dabber and wiped this back with a softer web type fabric (instead of tartalan cloth which would have left fine surface scratch marks in the acrylic. I immersed a few pieces of 250 gm cotton rag into water then blotted them with cotton towels and set them between newsprint.


plate reversed (inked side on the bottom of plate)
after first proof pulled on paper with press


first proof - notice how the ink prints darker tone in areas 
around shoreline rocks and in the trees due to the burr from
the plate surface.


the third print from the plate. Less contrast and gentler wiping
reveals more of the line and dot work.


Tuesday, February 16, 2021

recent activity re: printmaking endeavors


View from shore
2021
drypoint with hand color


Redpoll
2021
drypoint with hand color


Recently I decided to create a couple of small studies that combined intaglio with painting. The drypoint studies were drawn into the surface of thin acrylic (recycled product packaging that can cut into small pieces. Think of the cartons that have cards, food items contained in). The plates have a short life span when they are printed using high pressure of a press roller and only yield around 8 good prints off each plate. I decided to incorporate hand colouring to each one making it unique from the one before or after in the edition. I am finding printing small editions works for me in that less time is required in studio and these are not to strenuous on my body.

The first study is of a hoary redpoll perched on top of a fir tree. These small members of the finch family are common in this region over the cold winter months when they make their way down here from areas closer to the arctic. They have a noticeable red triangle that extends up to the top of their head that starts above the bill.  

The second study is a landscape based on a favourite lake I visit when I can. It is a late summer depiction of a view through reeds along shore looking across a section of the lake. 

Plate size for Redpoll measures 5 x 7.5 cm (2 x 3 inches). The image was drawn into the surface using a homemade needle (small sharp pointed compass needle held in place by the clamping mechanism of a mechanical pencil).  I have had that pencil since my college days over 40 yrs back. 


I used Cranfield safewash carbon black etching ink to wipe into the lines on the plate. Plates were printed onto Magnani 250 gm cotton rag. Once the ink had dried I introduced colour using liquid acrylic inks thinned with water.


plate with needle drawn image in surface 


For this recent landscape (below) again I have used thin acrylic plate. The plate size measures 8 x 11 cm (3 1/8 x 4 1/4 in). 


image/plate size for Redpoll measures 5 x 7.5 cm (2 x 3 in)


Sunday, May 26, 2019

Part 2 - Metal plate drypoint - reusing a failed polymer plate

detail from print before hand-colouring application.

this is the second part of a two part post.

A smaller plate was cut from the piece of larger plate I had salvaged in the previous post. A sketch on paper was created that was sized to the plate dimensions of 5 x 8.25 cm (2 x 3.25 in). 

One side of the stainless steel plate was then coated in black using a Sharpie permanent chisel tip marker. When it dried I taped a piece of Saral white transfer paper over top of the plate. A scan had been made from the drawing and it was printed in reverse on a piece of paper using an inkjet printer. I cut the paper leaving a .5 inch beyond the drawing edge so I could tuck and secure it with green masking tape to the underside of the plate. Using a 2H pencil I followed the main lines of my sketch and this transferred the image in white line onto the marker coated plate.


I found that a diamond tip drypoint needle gave the best results for working on a stainless steel surface (due to the hardness of the metal). With metal you will get a deposit of small metal along both sides of the scratched line (this is known as the "burr".) It will create a bit of a fuzzy like quality when ink is wiped onto the plate and printed. As this was a small image a swing-arm magnification lamp was used and with the needle I worked into the plate surface using drawing like movements (like those used when drawing with pen & ink.)
The black marker was then removed by wiping a bit of pure acetone on an old piece of rag over the plate surface.


Then I wiped a some etching ink into the lines to reveal the work better against the shiny metal. I then set a scrap of cotton rag (soaked + blotted) over top, put the paper and plate on the press bed and made a test proof by passing all under the blankets and beneath the roller of an etching press.


The proof revealed that more depth would be required in some areas to produce darker lines.


Lines were deepened with the diamond tip and some more minor details were added.


Once I felt that the surface was ready I re-inked the plate with oil based etching ink and put a piece of  soaked & blotted Magnani 250 gm rag over top then through the press.


After the ink dried I applied colour into the print with washes of diluted acrylic inks.


Part 1 - Metal plate drypoint - reusing a failed polymer plate


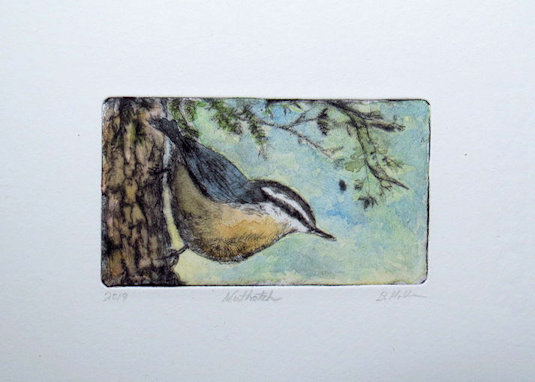
Nuthatch
metal plate drypoint with hand-colouring


Recently I did a bit of re-organizing of some boxes of items for use in my print studio. One item that I came across was a small box of printing plates (polymer coated) that had failed either during exposure of artwork onto the surface or the image did not wash out successfully during developing of plates in water. I had decided at the times when failure occurred to hold on to the plates and see if I could salvage them for another use.


During the process of cleaning off some old ink I noticed that rinsing the plate in hot water caused the hardened polymer on the plate surface to soften. I wondered if it might be possible to remove the polymer altogether so made it a mission to figure out how this might be achieved.

I thought perhaps applying heat with a hair dryer might work, and unfortunately it didn't provide the heat required.  I also didn't have an electric paint stripping gun which might have produced the temperature to soften the coating. 

As hot water had worked initially I decided why not immerse the plate into boiling hot water and let it sit for a few minutes. 


I thought maybe the polymer might remove easily with a fine steel wool. Instead it lifted off a gummy mess which fused into the steel wool bundle as the temperature of the coating cooled.

What did appear to work was scraping off the coating with a thin steel scraper tool that I use for removal of paint off windows.
However when the plate was removed from the boiling water I only had less than five minutes before the polymer would start to re-harden making it difficult to scrape and release off the plate. What I had to do was re-immerse the plate into boiling water and then continue.  The good news is this method worked and I successfully stripped all the coating from the thin stainless steel plate surface.


After scraping all the coating off I took some fine grade sandpaper and gave the surface a sanding using first up and down strokes with the paper then rotating the plate sideways and going across the metal at 90 degrees. I followed this with extra fine sanding sponge (same direction) and then a wipe with a clean rag.


Next post you can read about and view photos of a small new work that began as a drawing onto the metal and then worked into using a drypoint needle.

Wednesday, May 2, 2018

print from a single plate that combines three techniques

https://www.etsy.com/ca/listing/612814647/small-landscape-combination-drypoint?ga_order=most_relevant&ga_search_type=handmade&ga_view_type=gallery&ga_search_query=&ref=sr_gallery-1-39


Back in October of last year I posted about a print I had made from using a single clear acrylic plate. 
http://myprintmakingjourney.blogspot.ca/2017/

This combined colour relief roll, monotype and drypoint. I had only made a couple of prints at that time. The plate was put into a safe place and I became involved with other projects   

Over the past couple of days I decided to return once again to printing a small edition off of this plate. I took photos during the process which I believe may explain better how I achieved each print on paper from the plate. I am hoping to print an additional 6 for a total of 20 over the next day or two. To date I have printed 13.

I am printing these using Caligo Safewash etching inks. The etching ink is also used for the relief/monotype stage.


Each print is made onto Somerset satin white rag. Using moisture activated butchers tape I affix each print onto a thin mdf panel where they are allowed to dry. The tape also keeps the slightly damp paper from buckling. 


The plexiglass (aka perspex) plate. Here the surface scratched line is revealed by applying and wiping black etching ink across the surface.


The plate showing colour relief roll of ink on the surface and the beginning stages of subtractive monotype. I create a colour blend for the blue on another larger piece of acrylic using a soft rubber brayer. I achieve this by applying prussian blue with a little white to establish the darkest hue at the top. I set a little white a couple of inches beside this and by rolling the ink with the brayer forward many times the two intermix until a nice blend from dark to light occurs. I then carefully transfer this from the roller onto the plate surface.
The light biege ink on the bottom foreground rock was applied with an even smaller width rubber brayer. This is achieved by first determining by eye where to start the brayer to meet at the line of blue and moving it across the surface to deposit the ink and not touch the wet blue ink. It requires a bit of skill and steady hand co-ordination.


Here you can see where I have removed ink using various tools (cotton swabs, rolled tissue, tip of a bamboo skewer) that will print as negative space.


Result of the printing of the colour relief roll and monotype for the first stage. 
The plate was set onto the press bed inked side facing upwards. I used a registration sheet underneath with markings made in light pencil to center the plate and also indicate where the corners of the paper should be. Soaked and blotted Somerset satin 250 gm rag was set over top. A piece of clean newsprint was set over the somerset and then the three wool felts were placed over all of this. The plate had a 45 degree bevel filed along the edges earlier. The pressure of the roller created an embossed mark around the print edges during printing. This will assist in positioning the plate a second time (ink side facing down) for the drypoint.


The colour ink residue was cleaned off the plate surface (using a rag and vegetable oil). I wiped carbon black etching ink into the recessed lines that were scratched on the plate earlier (the drypoint component). 
So now came the really tricky part. Carefully using a combination of steady hand and eye coordination I positioned the plate ink side facing down and set it over top of the colour print. The emboss from the bevel helped me to set it into place. 
I then set my clean hand over the plate. I placed my other hand underneath the paper and with a bit of slight pressure set it under the area where I had the plate pinned to the paper with the other hand on the opposite side. 
I slowly flipped it over so that the plate was underneath. I set this down on the press bed at a 45 degree angle and as the plate was lowered into a horizontal position I removed my hand slowly from underneath but made sure my hand over top of the paper and plate was pushing and making sure the plate wasn't slipping out of position underneath. I could tell once the paper was down flat as the raised shape of the plate from the previous printing held the plate in position. 
Clean newsprint was set over the back of the paper and once the felts were lowered. This time I set the hand that wasn't turning the press gears on top of the felts over the plate and paper area to hold in place until it was caught by the edge of the roller as the bed was moved under the roller.
When I lifted the paper after it had cleared the roller on the other side I saw that the drypoint element had printed nicely where it should be and the colour underprint was also in alignment.


Prints drying in a warm room. I use both sides of the boards to attach prints so angle them slightly out from the wall to allow for airflow on both sides during the drying process.