 |
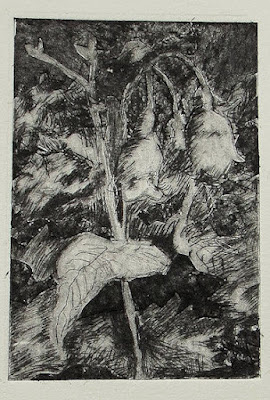
small botanical print made from a Tetra-pak plate
|
Several years back I came across a blog by a European printmaker who was making original intaglio prints using tetra-pak juice boxes. These containers are originally used to contain liquid foods. The boxes are constructed from paper board with a thin foil layer fused onto one side and then are coated in a thin layer of plastic. This artist was cutting panels from used containers and using these as a surface from which small hand-printed intaglio prints could be achieved. She had success marking line into the surface using needle tools. These lines would hold etching ink and would transfer to paper under extreme pressure (usually with the use of an etching press).
I recently decided to try this material out for myself, being a bit of tetra pak containers find use in this household. It was also an experiment to learn how the plate might perform printed as small detailed images. The artist who inspired me had minimal detail in her print designs and areas of dark contrast achieved by cutting and peeling away areas of surface layer. She added some line and texture in the remaining surface using a pottery needle to scribe line.
I had a sketch on hand that was recently used for a larger acrylic painting on board. I redrew my sketch onto tracing vellum (reduced scale) to fit a small plate that measures 5.5 x 8 cm (2 1/8 x 3 1/8 inches) and then reversed it and retraced the line using a 6B lead pencil. This was then positioned (6B graphite tracing facing the plate surface) over top of the tetra-pak plate and secured it with cellophane tape to the underside of the plate. I then drew over the graphite line with a fine line permanent marker. The next stage was to remove surface areas where the darkest tones (created by the ink deposits in the lower regions) would be printed.
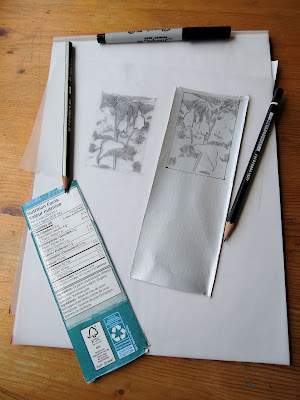 |
tracing from sketch, front and back of cut panels from juice box
|
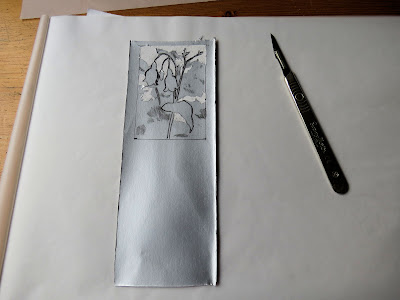 |
| cutting and peeling away surface foil area using surgical scalpel blade |
I carefully used a surgical scalpel to cut and remove the delicate surface area where I wanted darkest hues to print. Peeling away the plastic coated foil from the cut surface areas revealed a coarse paper board texture. This might hold a fair bit of ink which in turn would print dark after the wiping back of the plate before I printed it onto a soaked and blotted cotton rag paper.
 |
| plate ready to be printed after inking and wiping surface with newsprint |
 |
first print that ink was too spotty and weak
|
 |
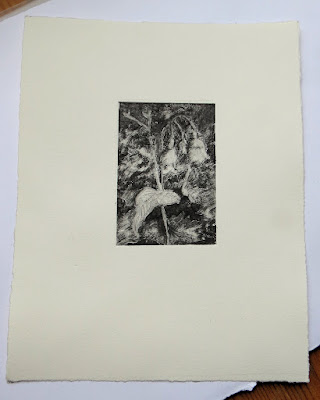
| the second print |
I applied Caligo safe-wash black etching ink again using a homemade rolled felt dabber and wiped the surface with yellow pages from an old phone book. The ready to print plate was then put on my press bed on a registration sheet, clean cotton rag paper was set over top along with an equal size piece of newsprint and then the felt blankets. I set my press roller to deliver tight pressure when the bed was passed under the metal top roller.
Unfortunately print #1 didn't yield a good image. The ink was faint in a lot of spots. Could have been any number of factors that caused this (too much wiping, ink too thin, paper too damp, etc...). After some modifications and a second inking of the plate results for the second print were better. There was some good contrast happening between dark and light areas. However that being said a lot of the tiny lines that were scribed into the surface didn't appear to deliver the details I was hoping for. I believe that the small size of the plate and the shallower surface marks made by the tools didn't deliver as good an image as those from a metal or plastic plate. None the less, I still see possibilities with tetra pak prints of small size maybe using designs with basic outlines and simplistic detail lines. I plan to explore this again soon.


