Monday, June 1, 2009

Resingrave - a new type of engraving surface for relief printing


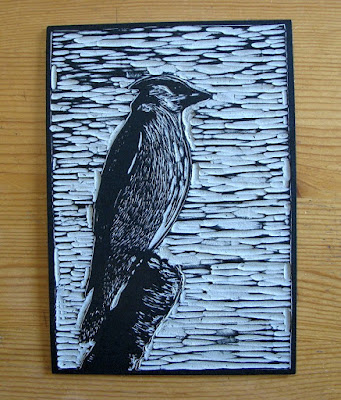
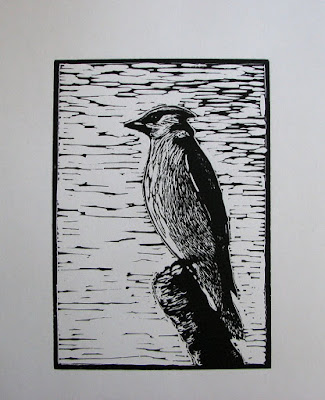
The Marsh
relief engraving
block size 3 x 6.5 cm (about 1.75 x 2.5 inches)
Daniel Smith Black relief ink printed onto Somerset 250 gsm rag white


Above is a photo and close up of the engraved surface from my first print created from the surface of a material called Resingrave. This study is from a very small block and required viewing it through the magnifying lens of a swing arm daylight lamp while cutting the surface.
Here is a link to McClain's in Portland, Oregon. They are a relief printmaking supplier/retailer who sell the Resingrave product. They also have a wonderful online gallery of works submitted by many known and unknown artists.
http://www.imcclains.com/catalog/blocks/resingrave.html

Last year I purchased a starter set of six wood engraving tools from McClains (manufactured by Edward Lyons Co.) and several blocks of a product called Resingrave. This hard resin epoxy material is bonded in a thin layer onto a thicker layer below of MDF substrate base and is a synthetic version of hardwood. Since traditional boxwood is becoming an endangered species this was invented by a printmaker from California as a substitute. The blocks that I purchased are a new formula that has more resistance to chipping, something that unfortunately was a problem with the original formula and turned a few people off of using it. In addition to the resingrave I purchased a small leather cushion filled with sand to set the block on while cutting (this makes it easier to turn the block when you are cutting round lines). First I coated the surface of the resingrave with black india ink and when it was dry then I drew on top using a Sakura gelly roll white pen. When the surface area was cut away (using the white ink lines as my cutting guide) the contrast off white of the resin epoxy material was exposed, so this more or less shows you a bit of what your image will appear when it is printed in black and white (but in reverse).
I was able to locate a cabinet maker locally who possessed a fine tooth carbide blade and a table saw, he was able to cut down the larger blocks into smaller size pieces . I used a small tabletop etching press to print the block. I first created a set of runners made of compressed particle wood material (MDF) with a thin layer of easy to cut vinyl material glued on top. I wanted to make these the exact height as the resingrave blocks as they would be positioned under the roller to keep it level. Then I would set a 1/8 inch sheet of millboard over top of the damp rag paper which was positioned over top of the inked block and passed the works under the top roller with just enough of a slight pressure to allow a good transfer of ink onto the paper. In the photo you will notice that some of the uninked cut areas that define the sky were embossed into the paper creating a very interesting subtle 3D effect that is quite noticable when light hits it at the right angle. This is a technique called blind embossing.
I have also experimented with other papers including Masa oriental paper and Zerkall paper that is made in Germany. These are not soaked and will not reveal the wonderful embossing effect to the degree that a heavier damp paper will.

Below is a photo that shows the block surface with ink rolled on the flat surface and the resulting reverse image print.


The summer months are going to be spent with more exploration of this medium.

Thursday, April 30, 2009

landscape - demonstration print for teaching relief block


Lake Superior shoreline study
five colour working proof print
speedball w/s ink on subi block paper
printed using hand burnishing


I am starting a classroom based printmaking project next week in a elementary school about an hour east of Thunder Bay. The students will learn to create several multiple colour relief block studies based on landscapes of the region.
The print pictured above is a piece that was created specially for this project. It is a study of rocky shore along Lake Superior. Will be using it as an example to show how to print a landscape using a combination of different types of relief surfaces (softoleum and scratchfoam in this case). It also illustrates how one can layer colours from different relief block surfaces to build an image.

Fig. 1 shows the initial pencil sketch which was scaled down to fit the softoleum block which became my master or "key" block.
fig. 1

fig. 2
Figure 2 shows the colour layout that I did in marker. This will serve as my guide for mixing my ink colours when the blocks are carved and ready for printing.
In figure 3 I have cut away the surface of a piece of softoleum with linocut knives. First I coated the surface using black permanent marker and then using my sketch as a reference I redrew the image on the black surface using a silver gel pen. The light silver colour lines and shaded areas were cut away to leave the surface areas that would determine the relief when it is printed using black ink. This material cuts very easily so I had to just lightly dig in with the tool tips to remove it. I wanted to create a bit of depth from the lower section so I went over that later with a larger U gouge blade to remove more of the rubber like material.


fig. 3

Fig. 4 is an example of a simple registration system for printing. One important observation I made is for exact registration the block height and horizontal level that the paper rests on the block should be about the same distance. Any variance in height can cause a slight misregistration when printing. To allow my paper to lay horizontally level on the 3/8 inch thick softoleum keyblock I found that a strip of 1/4 inch foamboard with a strip of matboard on top of this created a header bar to which I could pin my paper at the top of the registration board. What I did was tape this header bar to the top edge of a baseboard (cardboard). I also cut the baseboard to be the same size as that of the paper which is 23 x 30.5 cm (9 x 12 inches.) The paper was secured by applying four evenly spaced thumb tacks pushed through the paper into the foam strip underneath.


fig. 4

The blocks were secured in place for printing on the registration board by first centering the key block then taping strips of matboard around the sides and along the bottom edge. The additional blocks which were the same size as the key block fit into this U shaped brace. The paper was placed over top of the inked block, hand burnished and then carefully folded back and held down wiith one hand while I removed the block. Then you can remove the tacks and hang the print to dry until ready to print the next colour in which you match up the pin holes in the paper with the foam strip (the thumb tacks will fall into place easily when you find them.
A tip is to make a black dot by using a marker point around the pin hole on the foam strip. These dots can usually be seen through the paper. This helps to relocate the depressions in the foam where the tack points will depress when reattaching the paper to the board.

Fig. 5 illustrates several colours on the paper printed from the styrofoam (scratchfoam) sheets.
Sheets of scratchfoam were glued onto both sides of a piece of foamboard. First of all it made the block the same height as the softoleum block. The second benefit is that it also allows both sides of the block to be used.


fig. 5

Thursday, April 23, 2009

Pukaskwa/Driftwood Beach - the finished print


Pukaskwa/driftwood beach
colour relief blockprint
2009

Finally completed this study which started off as a single colour black and white print.
I wasn't satisfied with the hand colour application so made a decision to cut additional blocks and add in a majority of colour with ink. However a little hand tinting was still used in the driftwood and background foliage. It is hard to tell from the photo but the variations of the light washes of Payne's gray would have been too much work to try and capture printing off another block surface. It also simplified things to paint in the little area of green for the foliage as it is small and subtle. The ink printed a little darker than what was shown in the computer visualization, however the darker hues appear to add more drama which I don't mind at all.
The granular texture in the sand was created from the surface of a piece of wondercut linoleum which produced a grainy effect . This was intentional as the hint of texture added more interest into the image.
The two different colours of blue were printed from one block, the water section was cut away as a jigsaw insert, was inked seperately and then set back into place and printed along with the blue sky with one pass of the press roller.
In the process of printing an edition of 50.

Wednesday, April 15, 2009

Pukaskwa National Park - driftwood beach


Continuing on with the blockprint series this is my most recent work. The above image is the first proof taken from the cut block which was printed in black ink onto Subi paper.
It is a landscape study featuring driftwood and washed up weather beaten logs that litter one of the many pristine white sand beaches located at Pukaskwa National Park on Lake Superior.
I plan to apply watercolour to a few and then possibly a series of prints created with the addition of colour blocks. 


The block was glued down onto a masonite panel substrate and then cut with a variety of linocut tools plus one or two spitsticker wood engraving tools for fine detailing.
I refined the image a bit more with some additional cutting of the block. There is now better definition of the background foliage and also the water to the left side of the print.
The image developed by referring to a couple of digital photos that were taken last fall when we visited the park. Once again I blackened the surface of a piece of linoleum (13 x 18 cm or 5 x 7 in.), however this time used a golden cut variety instead of battleship gray. This allowed me to see the block as it would print (only in reverse) as the lighter areas of the block material would appear as white on the paper.

Below is the freehand sketch on the linoleum surface made with white Sakura gel pen.
The attachment below that is of the block during the cutting stage.


Friday, April 10, 2009

Wolf lake relief block with watercolour


Wolf Lake - North View


Here is my first attempt at the application of watercolour into the image. Since the paper is a slightly textured 250 gsm rag suited for printmaking it also accepts the washes of the watercolour very nicely. The print was secured to a birch board by fastening with butchers tape around the edges to keep it from developing a permament buckle from the wash application.

Tuesday, April 7, 2009

Wolf lake - working proof


I have cut the block and decided to print a test proof. The block had black oil relief printing ink rolled on and was printed onto Subi white blockprinting paper. I spotted a couple of areas that will be refined a little more with cutting tools before the final print is made. My intention is to print this in a single colour (black) on ph neutral paper like Coventry rag or Somerset. Then watercolour will be painted into the image.

The block size is 13 x 18 cm (5 x & inches).

Below is an example of a print I did in 2007 titled Lake Marie Louise which incorporates this hand colouring technique into a single colour of ink printed on to watercolour paper.


Sunday, April 5, 2009

Block relief landscape - Wolf Lake, Northwestern Ontario


Here is the start of a new study. It is a depiction of a place called Wolf Lake, which is found in a remote wilderness area about an hour and a half east of Thunder Bay (a bit of drive in off the trans Canada highway) near the small town of Dorion. It is accessible by a bumpy surface gravel bush road which follows the western shore of the lake for a good part. I had the opportunity to visit Wolf lake in August 2008 and from the many photos taken that day this sketch was derived. The shoreline on the eastern side of the lake is defined by escartment and cliff face giving one spectacular views from both above and below.


The area is part of the Ouimet Canyon geological system. The Wolf River flows out of the lower end of the lake and southward until it empties into Lake Superior.


The freehand sketch was made using Sakura gelly roll white and silver ink permanent marker onto a piece of battleship linoleum which has been darkened with a Sharpie Chisel point permanent black marker. The next stage is to mount the lino onto an equal size piece of masonite board to keep it flat for the cutting and printing stages.

Wednesday, April 1, 2009

Cedar waxwing block print - mid stage developments

Continuing with the new block print I have now created a second block from which the colour ink that defines the background sky will be printed. However first I decided to mount the linoleum keyblock onto an equal size piece of masonite board to help keep it flat and also allow a better application of ink with the roller. I simply glued the two pieces together and set a weight on top until the adhesive had completely dried.

For the background sky block I am using a piece of easy to cut vinyl mounted on top of masonite. This keeps it the same height as the keyblock and will not create an offset on the print paper due to height variance. I traced an outline of the bird and stump shape with carbon paper onto the easy to cut vinyl and then cut it away with a U gouge knife blade. I also trimmed back the material around the perimeter of the block surface (about .3 cm or 1/8 inch). When I overprint my opaque black keyblock the black line will cover over this gap.


Easy to cut vinyl mounted on masonite board and inked using a roll blend from dark to light


My Japanese soft rubber brayer hanging on hook with blend roll of ink applied to the (24 cm or 9.5 inch long) cylinder awaiting application on the block surface


The background sky block is printed first (ink was applied using a blend roll where dark and light blue are blended together and applied by roller onto the block). Notice the white open areas that define the shape of the bird and the tree stump. These will remain white underneath the black key block outline and will allow me to apply watercolour to add the colouring in the bird.


The block ready to be printed using the press roller. I will set the paper over top and secure that usingthe three hole punch (the blue plastic and metal on the left hand side. A thin paper board is set over top of the print paper and it is passed under the press roller transferring the ink to the paper.


I have decided that the variation in colours in the bird itself would be a bit tricky to cut blocks to print due to the small area of colour needed, therefore I will apply watercolour into this area by hand. I have cut back all the line (aside from the perimeter border) on the key block to allow the bird to stand out. The colour blend in the background will act as the area of interest around the bird but not take away from the focus.


Next post will feature the key block printed over top of the blue and one of the first hand coloured finished prints.

Saturday, March 28, 2009

early stages - new block relief print


In continuing with a bird theme I decided to do a study from a photo I took last year of a cedar waxwing perched on top of a dead birch tree stump.


I put the photo in front of me and then by eye sketched freehand right onto a piece of gray battleship linoleum that was first coated in black ink from a broad tip waterproof Sharpie marker. The sketch was made on the black using a silver ink extra fine point gel marker. It dries quickly and won't smudge when the lines are dry. The contrast is great and allows me to use the lighter line as my cutting guide.


For this study my plan is to leave a thin line in the keyblock that will be around the print. I also want to add colour so may cut and print several more blocks or I may just apply hand colouring, haven't really decided yet.


I cut away at the block with a variety of gouge shapes but mostly a large U shape gouge for the broad areas that will define the sky. I then carefully added fine line detail in the bird using a wood engraving spitsticker tool.


Then it was time to roll ink across and take a test proof to determine how much more I still need to cut away. It is hard to tell in the background sky what lines will show up until ink is rolled across the surface. Here is the resulting proof produced on bond paper with w/s ink.

I think the sky is a little busy for my taste so will remove more line (but leave a hint here and there just to add a little interest.) Adding colour into the print will also give it a whole new dimension so may do a marker or watercolour rough mockup first from which I can decide how things will work.


Wednesday, March 25, 2009

A small photo based etching with hand colouring


The print above developed out of some shots taken with my digital camera last week. Using the zoom lens I was able to capture some nice studies of a small Northern Shrike who was sitting on a lilac shrub branch in my back yard. There is a good sized colony of finches and sparrows around the property who find shelter over the winter in a fair number of old growth spruce and cedar trees that border the yard, and a few predatory birds have been known to stop on occasion to make a meal of one of the small songbirds. Although I did not see this Shrike kill I believe that this was the case. This birds presence also signalled that spring is very close due to migration.

From the photo I was able to print a grayscale positive onto an inkjet transparency sheet, then it was exposed onto a small square solar plate (7.5 cm or about 3 inches square) with UV light from my homemade exposure unit. Followed this with a scrubbing in warm water to develop the image into the polymer and when plate was dry I filed the corners to round them. The sides of the plate had a bevel created by shaving the edge of the polymer coating with a sharp utility blade knife that was drawn towards me angled at 45 degrees.
An application of bone black oil base etching ink was wiped into the recessed lines, and finally the surface received a polishing using yellow pages torn from an old phone book. The image was printed into damp Coventry rag paper passed through my small etching press with 3 layers of felts set over paper and plate.

Once the print was removed from the press fastened the paper to a small wood panel board with butchers tape around the perimeter and when it had dried applied subtle watercolour washes to the image. I first painted on some liquid frisket in spots around the edges of the bird's body and the branch top and bottom. When it was removed it left whitish highlights of the sun defining edges.

Will print an edition of 20 (all variable) since they are going to have hand colouring applied into each one.