Thursday, May 8, 2014

Elementary School Art - Styrofoam jigsaw prints - Grade Four


jigsaw relief prints hanging to dry in the classroom


I just completed a styrofoam relief plate printmaking project with 23 grade four students. The theme explored was Medieval times.
Students were challenged throughout the project and had to move through several stages.
These included: 

  • research of subject matter and sketches
  • transfer of sketch to a soft polystyrene plate using tracing paper using ball point pen
  • incorporation of textural elements
  • disassembly of the plate into separate sections
  • application of inks
  • reassembly of individual pieces
  • transferring ink to the paper using hand burnishing techniques
  • printing more than one copy from the same plate surface


clever use of ink application by small tip brush for small intricate areas 


after the plate is cut apart the students to had to reassemble it. Individual pieces were removed one a time and water based block printing ink was rolled onto each piece using a soft rubber brayer.


printing set up. Table for ink application with cookie sheets, ink, non-slip pieces of material to set pieces onto to apply the ink and metal handle soft rubber brayers

 assembling plate with inked pieces 


This project used the following materials:

  • scratch foam plates
  • ball point pens
  • xacto craft knives and scissors
  • black kozo paper
  • Graphic Chemical water based relief printing inks
  • soft synthetic rubber brayers
  • rubbing sticks, spoons
  • tracing paper, layout paper                         


assembly of inked pieces


plate inked and reassembled for printing


placing black paper over the plate and using a brayer to facilitate ink transfer


 dragon


 mythical unicorn


castle

harlequin suited court jester


 shield


 castle


 flag with crest


another dragon


prints pinned onto a strip of cork just above the chalkboard


Monday, May 5, 2014

Collagraph study - polygonum (knotweed)

Polygonom - Quetico 

I recently printed a few black and white proofs from a collagraph plate that I had constructed by in February. It is titled Polygonum (the botanical classification of this species of aquatic weed.) It is also known as knotweed or smartweed and is actually a member of the buckwheat family. This is one of a number of studies that examines flora/fauna found here in Northwestern Ontario. My new works project is being funded by a grant from the Northern Arts program through the Ontario Arts Council.

Using a photo I had taken in Quetico Provincial park in September of 2013 as reference I drew the composition first onto a thin matboard plate in pencil. A variety of materials were used to construct the low relief including paper, modeling paste, rice kernels, old man's beard moss and liquid PVC glue. I also marked into the plate surface with the sharp blade of a craft knife. When everything was glued down and dry I coated the plate on both the front and back and sides with 3 applications of shellac.

various materials were attached using glue 
as low relief elements on the plate.

top layer of the mat board is cut and peel away to create areas 
that will print as darker shadows and shapes in the print.


I applied black vegetable oil base ink to the plate surface with a soft bristle tooth brush and then wiped the plate with tartalan cloth bundled up into a ball. I then carefully removed areas of inks for lighter highlights using the end of cotton swab sticks.

The print was made onto slightly damp Magnani revere 250 gm white rag and printed with medium pressure on my table top Blick etching press.

When the ink had dried to the touch I taped the print down onto a plastic core board and applied thin layers of watercolour and liquid acrylic inks to add in the colour.

Sunday, May 4, 2014

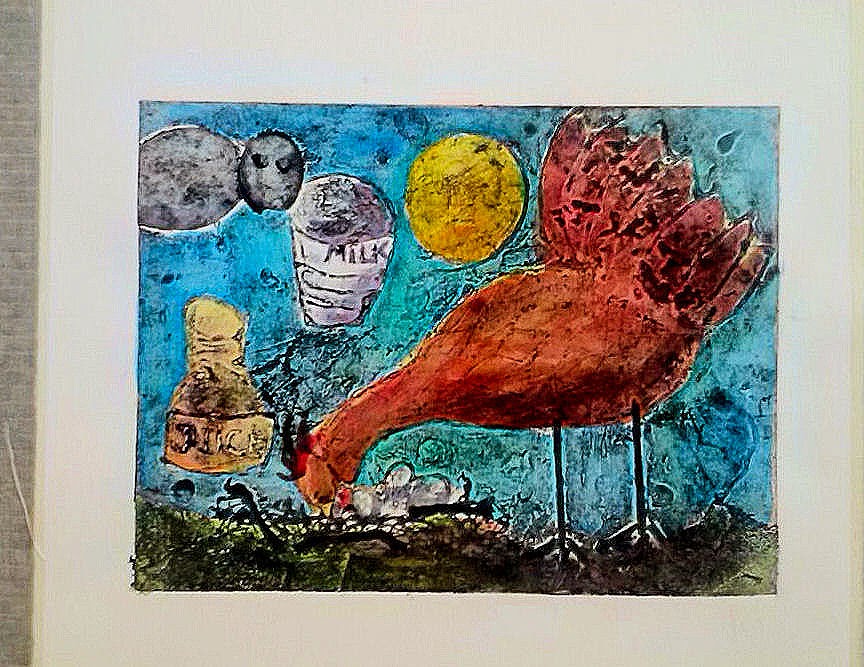
Elementary School art - Collagraph with hand colour application

Food by Ariel
Grade 6
Teacher: Mr. Van Hatten
St. Martin Catholic Jr. Elementary School
Thunder Bay, ON


This post features some process description and a few photo examples from a collagraph plate printmaking project I undertook recently with the same Grade six class that were also featured in my last post (drypoint and wet media application).
The class chose the theme of Social Responsibility and through research and development of rough sketches ideas came to light as low relief collage plates. Various materials including string, glue, cut out paper shapes, organic and man-made fibers were used and adhered onto a thin card plate surface using modge podge adhesive. 

Once again I began the session by giving a viewing of short duration instructional videos courtesy of You Tube on the technique. I brought along a few examples of some of my own work that married collagraph print imagery with colour applied using washes of watercolour and/or acrylic inks.

Students made pencil drawings on the thin card plates and these were used as their guides to apply the various materials that would ultimately create the final print on paper.


application of small cut paper shapes to create a tile roof 


materials included wood shavings, plastic mesh, paper, bark among other things


a study the examines the importance of food in the scheme of social issues. Notice that the student wrote her words in reverse (although the L in milk was incorrect...but she corrected this before proceeding)


Students applied Caligo Safewash etching ink to the plates using soft bristle tooth brushes and sponge foam brushes. Ink was also applied to the higher relief areas using finger tips and brayers. Plates were printed onto 250 gm white cotton rag paper using medium pressure when passed under the top roller of my small table top etching press. I added a bit of magnesium carbonate as a drier for the ink and in about a weeks time we were able to add the watercolour to the prints when the ink had dried enough not to create a blending problem.


this plate became the print at the beginning of this post


collagraph printed with oil based black etching ink


application of watercolour to the print


prints were affixed to pre-cut scrap core-plast boards with masking tape 
before the wet media application was made..

Elementary School art - Drypoint and wet media application


 drypoint hand-coloured with watercolour


the Sleeping Giant


nightmarish landscape


urban landscape


 aquatic landscape


 I recently worked with a grade six class and the first of two print based projects we undertook was creating images from acrylic plates using a method known simply as drypoint. To further enhance the prints watercolour was added after the ink used for the prints was allowed to dry. The best way to introduce any technique is to give an actual hands on demo. I also give students tiny sample pieces of plates and blocks. This way they become familiar with the tools and surface ahead of progressing to the main project. We also usually take some time to discuss the project and break potential subject matter for studies into the form of sub-categories from a chosen theme.


Step #1 - drawing 

Students drew a rough sketch on paper to the plate size. Because the thin acrylic plates are clear the sketch can be set underneath and used as a guide for scoring line into the plastic surface using an etching needle.


sketch and plate secured over top using pieces of masking tape


Students were given a preliminary lesson first on drawing techniques and composition. I demonstrate a few ways to incorporate textural elements to their plates including spacing of linear elements, stipple, cross-hatch, lightly roughing the surface with sand paper. The idea was first to produce line of different weight and depth into the plate. This would translate as thin light or heavy dark when ink was applied and the plate was printed. The same would apply for texture depending on the amount of texture added. 

Step #2 - scoring the plate using the sketch as the guide


scoring the surface by scratching with a sharp needle point.
The tools were constructed by drilling a small hole into the end of a 1/4 inch wood dowel. I then inserted a stainless steel darning needle (a bit of masking tape was wrapped around the end to stabilize the needle.)


this technique requires patience and frequent rest breaks from the scratching process


setting a piece of dark paper between the sketch and the plate 
helps to reveal what has been scratched into the plate surface.


Step #3 - application of ink and printing

For this project vegetable based Akua intaglio inks were used. These are non-toxic and stay workable and open like traditional oil but without the odor. But the real bonus is that they clean up easily with detergent and warm water.
Students apply the ink using old used soft bristle toothbrushes to get the ink down into the lower recessed line in the plate surface. This is followed by wiping the surface of the plate using a mesh type interfacing material (found at most fabric shops). Then a final polish of the plate surface is made using clean tissue type paper and the palm of ones hand (the type of tissue that used for examination tables in medical clinics).

Pre-moistened rag paper is set over top of the plate which is placed on top of a press bed. Newsprint is set over top of the paper and then the wool felts are placed over this. The press handles are turned which in effect passes the plate, paper and blankets under the large metal press roller (preset for a specific height and tightness beforehand). When the bed is on the opposite side the blankets are lifted and the paper is very carefully lifted to reveal the print on paper. The extreme pressure has forced the softened fibers of the paper (from the dampening beforehand) down into the lower scored inked areas which effectively transfers this to the paper. The plate also leaves a slight embossment in the paper around the edges. 

plate and paper after passing through the roller of the press


the moment of truth


paint application


Saturday, May 3, 2014

Elementary School art - Printmaking exhibition

display of two colour foam plate prints

Apologies to my followers, I have been visibly absent from my blog for several months.  During this time period I have undertaken several new projects with another four grades during my year long artist residency. I also took on an additional short term side project at another school during the month of April.
Will be posting several entries over the next few days that will feature both completed and in progress photos and comments relating to my art educator activities since February.

But first I forgot to post the final printmaking project I did with grades one and twos back in January. This was styrofoam plate prints. I find this medium very adaptable to young artist. First this method doesn't pose any threats from injuries using sharp cutting tools, Ball point pens or pencil tips work fine. Students can also press shapes into the foam. One method I have employed to achieve this for example is to take string, lay it over the plate, put a hard cover book over top and have the young student stand on the book. Their body weight forces the string into the foam surface and leaves a embossed shape in it.


                         a grade one student drawing into a soft dense foam plate using ball point pen


drawing directly into the foam using a pen


detail of foam based drawing. The pen collapses the foam and the lower areas do not hold ink when it is rolled across the surface. The print produced reproduces the drawing as white line in reverse on the paper.

Water based relief printing ink (tempera paint will also work if you are on a shoe string budget) is applied to the plate surfacw with a soft rubber brayer (or soft foam brayer for tempera). Paper is set over top and using hand burnishing using either the palm of their hand or a tool like a rubbing stick or back of a wooden spoon pressure is applied thereby transferring the ink from the plate surface to the paper.


the inking area


In the photo above students and their teacher are engaged in application of water based relief printing ink to the surface of the foam plates. For this exercise one colour prints were made. I used metal cookie sheets for containing and rolling out inks onto the brayers.


Print made using blue ink. Notice how where the drawing remains as negative space defined by the white of the paper.  


Wednesday, January 8, 2014

Elementary school art - Printmaking - Monoprints


Today I gave lessons in simple monoprint printmaking to students from grade two and grade one/two split class.
The theme was "thinking of spring/summer". After an especially bitter cold and snowy December and beginning to January this hopefully raised spirits in the process.

I purchased a couple of inexpensive rolls of coated freezer paper to use as the painting plates.
I mixed water based block printing inks with Createx Monotype medium and this helped the paint grip the waxy side of the paper when it was applied with synthetic #5 watercolour brushes.

A quick fine spray of water mist was made to the painting to allow as a release agent. Subi blockprinting paper was placed over top of each painting. Students applied pressure using soft rubber brayers rolled over the top sheet and transfer of paint pigments were made onto the top sheet.

The young artists really enjoyed this activity and we were able to accomplish everything in the one hour sessions for each grade with a little prep of materials in advance.


Saturday, November 23, 2013

Challenges of teaching printmaking to very young artists

students making prints off styrofoam


I have learned during my recent placement in a local school as an art educator that there have been a few challenges involved with teaching printmaking to young primary school students.
With grades one and two level they are just beginning to learn about colour.
My first recourse before we are fully engaged in an activity has been to first explain a little bit to them about colour. Using the colour wheel as a visual aid has been the best way to do this. I try to make a little game out of this by telling them terms and then see if they can remember the terms.
Using word and number association is a clever way to help remember. I tell them that the three primary colours them are the first or #1. Mixing of the combinations of the 3 makes secondary colours which become #2. Tertiary or third colours are #3. Showing them the opposite colour in a straight line across the wheel helps them to recognize the complementary colour.

I also am finding that some of the key learning aspects with basic printmaking are shape and texture. Surfaces such as cardboard, modeling clay, craft foam and styrofoam are used as the means by which students can explore both of these.
Drawing skills are of course key to any artistic discipline so we also focus on this. I show them examples of line and related ie. dots, cross hatching, spacing of linear elements, weight of line, etc...
I also talk about key concepts such as repetition, pattern, contrast of colours, colour harmony, balance of elements in a composition. These require an explanation in it's simplest form so that the young minds can grasp what I am saying. I achieve this by drawing an example on the chalk board or pointing out a particular concept by showing them a famous work of art and how it illustrates and incorporates this.

I explain to them that what sets printmaking apart from other types of art approaches is the ability to make multiple images from a single source.

Challenges are discovered though the application of ink onto a surface (either too thin or too thick) and determining the correct amount of pressure to apply when printing using hand rubbing or stamping ( not enough yields a spotty print or too much pressure and you get a blob with no details).

My visits have been limited to less than one hour. This has forced me to deliver projects that can be accomplished either in one visit or in stages over several visits. It means I have to set up materials ahead of class and not dwell too much on discussion but give students engagement time to be creative.