Tuesday, February 16, 2021

recent activity re: printmaking endeavors


View from shore
2021
drypoint with hand color


Redpoll
2021
drypoint with hand color


Recently I decided to create a couple of small studies that combined intaglio with painting. The drypoint studies were drawn into the surface of thin acrylic (recycled product packaging that can cut into small pieces. Think of the cartons that have cards, food items contained in). The plates have a short life span when they are printed using high pressure of a press roller and only yield around 8 good prints off each plate. I decided to incorporate hand colouring to each one making it unique from the one before or after in the edition. I am finding printing small editions works for me in that less time is required in studio and these are not to strenuous on my body.

The first study is of a hoary redpoll perched on top of a fir tree. These small members of the finch family are common in this region over the cold winter months when they make their way down here from areas closer to the arctic. They have a noticeable red triangle that extends up to the top of their head that starts above the bill.  

The second study is a landscape based on a favourite lake I visit when I can. It is a late summer depiction of a view through reeds along shore looking across a section of the lake. 

Plate size for Redpoll measures 5 x 7.5 cm (2 x 3 inches). The image was drawn into the surface using a homemade needle (small sharp pointed compass needle held in place by the clamping mechanism of a mechanical pencil).  I have had that pencil since my college days over 40 yrs back. 


I used Cranfield safewash carbon black etching ink to wipe into the lines on the plate. Plates were printed onto Magnani 250 gm cotton rag. Once the ink had dried I introduced colour using liquid acrylic inks thinned with water.


plate with needle drawn image in surface 


For this recent landscape (below) again I have used thin acrylic plate. The plate size measures 8 x 11 cm (3 1/8 x 4 1/4 in). 


image/plate size for Redpoll measures 5 x 7.5 cm (2 x 3 in)


Friday, January 15, 2021

return from a lengthy absence to printing

For those who have noticed a long absence from this blog I have been battling a chronic disease for the past two years. The result was being forced to stop printmaking endeavours to focus on my health and recovery. 

One of the ways that helped me to cope with my situation was to re-focus my creative exploits and spend time painting (a lower impact activity that also allowed me to sit). Although I have enjoyed doing watercolour and I acrylic studies I realized recently how much that I really missed printmaking. So I decided to go into the studio and see what might be achieved.

Even though the disease still very much presents daily challenges I have discovered ways to alleviate some of the discomfort of standing and using my limbs in activities that require repeated exertions of strength, something which had been difficult to do. The secret was scheduling activity shorter in overall duration than what I usually was used to. For example, where I would spend several hours in one go in my studio, I now take a break after an hour or as my body tells me. I might then return later and spend another hour or two before calling it a day.

Yesterday I was feeling somewhat energetic and ended up spending some time in the studio mixing ink, applying it to the brayer and then onto an older carved linoleum block. This was used on the second block of a two-colour print titled Moon & Forest (an open edition) that I carved and printed in 2011. 

https://myprintmakingjourney.blogspot.com/2011/03/moon-influence-reprint-of-old-block.html


I used a couple of processes for the background colour block. The first was carving into the linoleum then carefully cutting it to remove as a small piece that required inking separatel. The second method was fountain blending of the ink using phthalo blue and white (blended by rolling the brayer repeatedly until the two inks mixed in a even transition). On the press bed I re-inserted the inked small circular piece into the circular hole.  The paper was set over top (paper secured to a homemade registration pin system) and I passed it under the preset roller to transfer it to paper. I was able to lay down the first colour layer onto nine separate pieces of rag. 


Today I am taking a day of rest. It is my hope that tomorrow I will feel well enough to return back into the studio to ink the key block and print this onto the nine prints in progress currently hanging to dry on the line in the warm basement studio.


In the meantime I have been looking at some older sketches and have developed some ideas for a brand new relief print. I have missed the feeling of carving into a surface and feel I can accomplish this again adapting to a reduce pace with frequent rest breaks. But my motivation factor is high and such good therapy too with the benefit of a little bit of physical exercise I get from doing this.

Friday, December 6, 2019

Absence from my blog since the spring

Hatty Cove - Pukaskwa National Park
watercolour
08/2019
Lake Superior Shoreline study
watercolour
10/2019


To those of you who follow this blog, you will have noticed an absence of posts since the spring of this year. This has been due to ongoing health issues and learning what these allow me to accomplish in terms of my creative pursuits.

With some idea now of what I am dealing with plus encouragement from partner, family & friends I have been able to adapt somewhat and engage in less strenuous endeavours in the studio.                                
Unfortunately anything printmaking related took a bit of a back seat to painting for the past several months. However I noticed I began to really miss working in mediums like relief printing. I am currently working on completing a few watercolour studies and hope to make time after New Year's to return to some of the print techniques I really enjoy. I decided that linocut would be a logical choice and believe I should be able to take my time and carve/print some new blocks.  Seated activities like this seem to be a much more comfortable and although a bit more time might elapse to achieve the finished goal it is reaching that final goal of a new print on paper that drives me.

I would like to take this opportunity to give a sincere heartfelt Thank You to those followers who have been patient and understanding during my absence. 

I wish all of you a merry holiday season and all the best in your lives and pursuits in the New Year!

Sunday, May 26, 2019

Part 2 - Metal plate drypoint - reusing a failed polymer plate

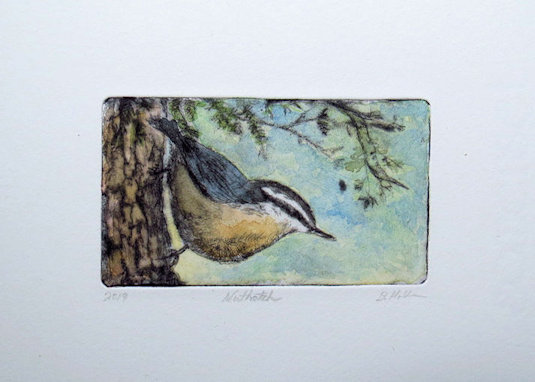
detail from print before hand-colouring application.

this is the second part of a two part post.

A smaller plate was cut from the piece of larger plate I had salvaged in the previous post. A sketch on paper was created that was sized to the plate dimensions of 5 x 8.25 cm (2 x 3.25 in). 

One side of the stainless steel plate was then coated in black using a Sharpie permanent chisel tip marker. When it dried I taped a piece of Saral white transfer paper over top of the plate. A scan had been made from the drawing and it was printed in reverse on a piece of paper using an inkjet printer. I cut the paper leaving a .5 inch beyond the drawing edge so I could tuck and secure it with green masking tape to the underside of the plate. Using a 2H pencil I followed the main lines of my sketch and this transferred the image in white line onto the marker coated plate.


I found that a diamond tip drypoint needle gave the best results for working on a stainless steel surface (due to the hardness of the metal). With metal you will get a deposit of small metal along both sides of the scratched line (this is known as the "burr".) It will create a bit of a fuzzy like quality when ink is wiped onto the plate and printed. As this was a small image a swing-arm magnification lamp was used and with the needle I worked into the plate surface using drawing like movements (like those used when drawing with pen & ink.)
The black marker was then removed by wiping a bit of pure acetone on an old piece of rag over the plate surface.


Then I wiped a some etching ink into the lines to reveal the work better against the shiny metal. I then set a scrap of cotton rag (soaked + blotted) over top, put the paper and plate on the press bed and made a test proof by passing all under the blankets and beneath the roller of an etching press.


The proof revealed that more depth would be required in some areas to produce darker lines.


Lines were deepened with the diamond tip and some more minor details were added.


Once I felt that the surface was ready I re-inked the plate with oil based etching ink and put a piece of  soaked & blotted Magnani 250 gm rag over top then through the press.


After the ink dried I applied colour into the print with washes of diluted acrylic inks.


Part 1 - Metal plate drypoint - reusing a failed polymer plate


Nuthatch
metal plate drypoint with hand-colouring


Recently I did a bit of re-organizing of some boxes of items for use in my print studio. One item that I came across was a small box of printing plates (polymer coated) that had failed either during exposure of artwork onto the surface or the image did not wash out successfully during developing of plates in water. I had decided at the times when failure occurred to hold on to the plates and see if I could salvage them for another use.


During the process of cleaning off some old ink I noticed that rinsing the plate in hot water caused the hardened polymer on the plate surface to soften. I wondered if it might be possible to remove the polymer altogether so made it a mission to figure out how this might be achieved.

I thought perhaps applying heat with a hair dryer might work, and unfortunately it didn't provide the heat required.  I also didn't have an electric paint stripping gun which might have produced the temperature to soften the coating. 

As hot water had worked initially I decided why not immerse the plate into boiling hot water and let it sit for a few minutes. 


I thought maybe the polymer might remove easily with a fine steel wool. Instead it lifted off a gummy mess which fused into the steel wool bundle as the temperature of the coating cooled.

What did appear to work was scraping off the coating with a thin steel scraper tool that I use for removal of paint off windows.
However when the plate was removed from the boiling water I only had less than five minutes before the polymer would start to re-harden making it difficult to scrape and release off the plate. What I had to do was re-immerse the plate into boiling water and then continue.  The good news is this method worked and I successfully stripped all the coating from the thin stainless steel plate surface.


After scraping all the coating off I took some fine grade sandpaper and gave the surface a sanding using first up and down strokes with the paper then rotating the plate sideways and going across the metal at 90 degrees. I followed this with extra fine sanding sponge (same direction) and then a wipe with a clean rag.


Next post you can read about and view photos of a small new work that began as a drawing onto the metal and then worked into using a drypoint needle.

Wednesday, April 24, 2019

new plate - new series and edition based on an earlier work


It has been a couple of years since I did a small edition from an  image that was scratched with drypoint tools into the surface of a thin plastic plate from repurposed waste packaging. 

http://myprintmakingjourney.blogspot.com/2017/02/re-purpose-household-waste-to-make.html

I was able to print 15 from the plate before the image deteriorated (after 15 the image became barely visible from repeated passes under a tight press roller.) The small fox study sold well once I put them out for purchase. Recently a couple of interested parties asked if there might still some of these prints around they could purchase. 


With this motivation I made a decision to create and print another plate with this image, but to do that I had to take a high resolution scan (originally made from one of that first edition) and using an inkjet printer and transparency film replicate the image onto a small polymer plate. 


Before  exposing the artwork on film to the plate I made some minor additions to the image on the film using latex based ink and quill pen.


The plate was post exposed after the initial image exposure/development of etch to harden the polymer permanently. Some lines that came out a little light was worked into with a fine needle tip to deepen them and these would hold just a bit more etching ink.

So far the first half dozen prints from the new plate have all produced a clean readable ink image on the cotton rag paper. I am not sure what the plate will yield but have read that polymer can produce hundreds of prints before showing deterioration. 


As I did the first time around I plan to again add hand-colouring to each print once the etching ink is dry.

Wednesday, March 27, 2019

miniature mix media prints - landscapes

Near Rossport
polymer plate etching with hand colour
2019
print image size: 4 x 7 cm (1.5 x 2.75 inches)


You might notice that the image at the beginning of this blog entry bears a similarity to a work featured in my last blog entry. That previous image was a colour linoleum block print. You would be right because it is very similar in fact. I adapted the same view and composition using a different printmaking methodology. It is also  about 1/10th scale in size and is therefore officially a miniature.  It also incorporates hand colouring to become an original mix media work on paper. (intaglio print & painting).

The sketch I made for my lino was scanned and reduced in size. I then printed it using black inkjet ink onto clear film. This was then exposed using a fine dot aquatint screen and UV light onto a small pre-cut piece of polymer plate (solar plate) that I had rounded the corners using a metal file. 


The image was etched into the plate surface by exposure to the light. Gentle scrubbing with a toothbrush and using tepid water removed surface area to reveal the image. I exposed the plate again (without the film) to UV to harden the polymer for good.


Black oil based etching ink (cranfield safewash) was wiped into the shallow recessed etched areas and I then put 250 gm weight cotton rag paper over the plate. A lot of pressure was applied by running it under the roller of a small etching press which transferred the image to the paper. The printed image is then secured to a board using moistened paper tape (also used for watercolour painting) and set aside in a warm space to dry (up to a week or more duration) 


print on paper and the plate from which it originates. Notice how the image is in reverse on the plate.


Once the etching ink dries I apply colour into the print using washes of thinned liquid acrylic inks with synthetic taklon brushes. The paper is then cut to size with the bottom leaving a deckle tear edge created by folding over a special ruler with a rough tooth.


The resulting print with colour. Each print on paper is different because of differences produced during the painting application. 


My plan is to continue with this same format in a series of miniature prints that are based on landscapes found around the region where I live.

Thursday, February 7, 2019

First new artwork in a while - rework of an older piece

Near Rossport along Lake Superior - 2019
four block relief print (7 colours)
image size: 15 x 20 cm ( 6 x 8 inches)


                                      My apologies to followers of this blog. It has been nearly six months since my last blog entry. I am still dealing with health related challenges and there are limitations in the scope of what I am able to do and for what length of time. However my creativity has not been stifled and I am making it a point to keep the proverbial creative fires stoked.


One way was to return to an old image and produce from it again with slightly different elements. I found an older block of mine that was carved back in 2007. The small edition six colour print originated from one carved linoleum block (key image) and three thin pieces of stryofoam mounted onto mat board plates. The shapes were drawn into, cut and mounted carefully on their supports. 
Prints were made by passing the blocks and paper under a roller (with set pressure) on my small tabletop etching press. However over time from multiple passings the styrofoam quicky deteriorated and cracked.


progress proof before some minor additions


I decided that a new version could be printed this time around by replacing the styrofoam with carved raised linoleum elements. There have been some changes in terms of water, and a mid background landform.
This was also an opportunity to use Graphic Chemical water based relief printing ink. The ink is very sticky (but keeps open on the glass slab for a day or two). It is not oil based ink but the base that suspends the colour pigments is derived from plant sources. Once printed onto an absorbent paper surface it dries quickly (a few hours in the right studio conditions.)

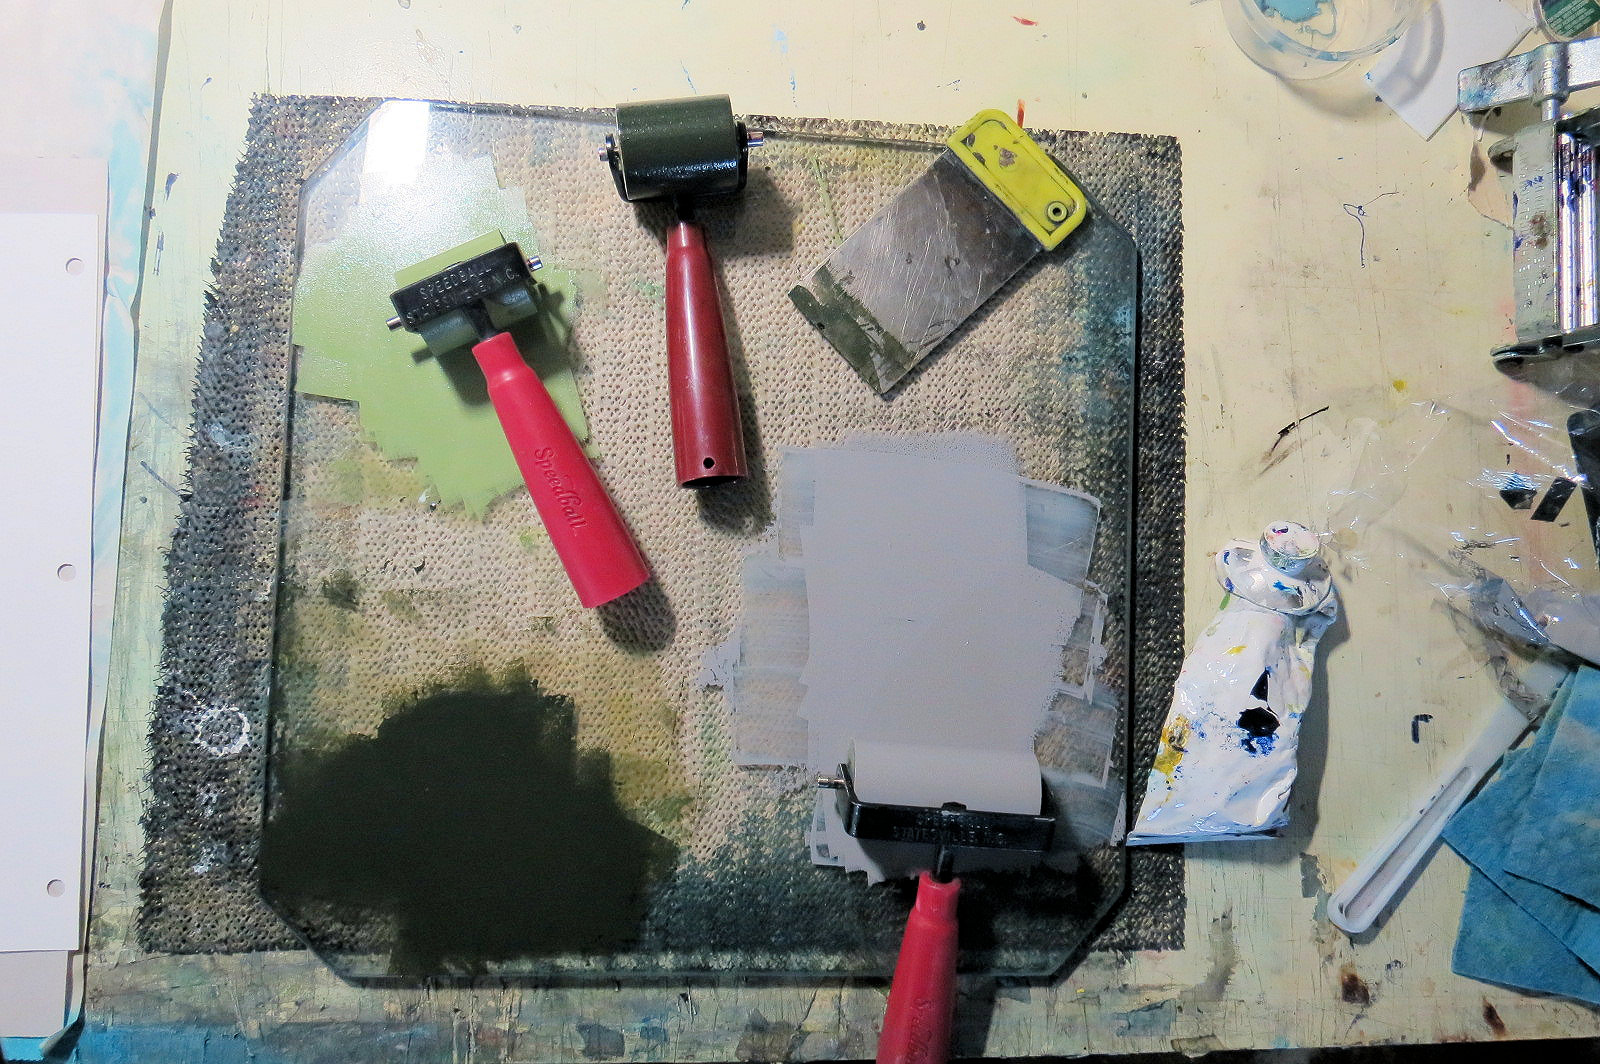
Tempered glass inking plate with Graphic Chemical water based relief printing inks and two sizes of rubber brayers.


Four blocks in total were used. Two blocks had separate pieces of lino cut apart that were glued onto an equal size substrate. Since some elements had separation between them I was able to use one block to print 3 colour elements in a single pass. Small brayers allowed me to apply ink to the raised lino shapes. The first block that created the water and sky used a blend of inks rolled out on the glass. I put two small dollops of different tones of blue and then a bit of white ink beside the lighter blue.


A registration board system was used that had a 3 hole punch to hold the paper in place and also an area that the blocks of equal size could be held steady and would line up when printed in layers.


progression from block #1 - blend of blues and white followed by the layer of ink from block #2 far dusty blue-teal landform


Monday, August 6, 2018

Health issues affecting my abilities & significantly reduced studio time

Pukaskwa
hand-coloured polymer plate print
varied open edition
image size: 5 x 9 cm (2 x 3.5 inches)


It is the first week in August and you might have noticed that I hadn't posted any new blog entries since May.
I have been dealing with two problems involving my health and that have been affecting creative pursuits.

About 13 months back I started to display some mobility issues with my right shoulder accompanied by noticeable pain in the rotator cuff. I was referred for physio-therapy and did this for several months usually once a week. However there really didn't seem to be much improvement occurring.

By mid winter I noticed real discomfort occurring while using my right arm that forced me to limit the amount of time and type of physical work being done ie. creating plates. It was especially difficult when I was using a press (the manual rotation movements required for turning press gear handles).
The inflammation and accompanying pain would require me to take a couple of days of rest before I could resume anything. The exception was low impact activity like painting small work, as the arm and shoulder joint weren't as taxed. But this also required shorter duration periods of rest between applications.

In the spring I was referred to an orthopedic doctor. Back in the late fall I underwent ultrasound imaging. In April I had more detailed imaging which confirmed I have a sizable calcific formation located between the bursa muscle and the joint in my right shoulder rotator cuff region. The recommendation of the surgeon was for me to undergo an ultrasound guided lavage (needling). This procedure has a syringe tip puncture a protective barrier that surrounds the calcification, fracture the deposit and allow the calcium to leach from the area and absorb back into the body. After a lengthy wait I finally underwent the procedure last week. I am presently keeping the arm and shoulder moderately active during recovery but not subjecting it yet to turning press gears. It has lifted my spirits a bit too and there are a few projects I am anxious to return to asap.

The other major health issue is still unresolved and has proved to be a bit of a mystery. I was experiencing digestive issues back in the fall and early winter (some discomfort after eating but also some other things like fatigue, sensitive spots around the body.)  I altered my diet to reduce fats as I believed there might be a link.  After undergoing a number of imaging procedures (colonoscopy, endoscope, barium xrays and CT scan) nothing proved to be a problem with the digestive tract. Some guesses were made about it being gastritis. Conditions like irritable bowel were not looked at though. The restricted diet caused my body weight to drop over a a period of 2 - 3 months by 20 lbs. The problem of the last month or so has been trying to regain weight...I am finding this to be very difficult. Have made some slight improvement (a couple of pounds over the last 4 weeks) by really increasing daily calories. (referring to info i obtained after doing some online research for healthy sources of calories). 

I have still been experiencing short periods of discomfort after consuming some foods that contain fat (although I have made it a point to consume low to moderate fat in the diet...after all we do need some facts for body function). And I am mindful of daily physical activity so as to not burn too many calories. Unfortunately some of my favourite activities during the warmer months have not been possible ie. hiking, kayaking and even working on home renovation projects. It is just something I have made peace with for the moment. Hope the slow gain in weight will eventually have me back to a normal life down the road. 

For the meantime I am working with health care providers (and a dietitian) to explore possible issues with my metabolism, thyroid problems and also other organs like the gall bladder, pancreas and liver to see if we can determine what is the root cause. (CT scan didn't reveal anything out of the ordinary and the doctor told me that the dreaded "c" word was not detected.)

To keep my spirits up and also keep my creative juices going have been hand-colouring some small prints from the storage drawers. I also have been working on a small acrylic painting or two. These activities are not really painful on my arm and shoulder.

Last but not least...one sign my rotator cuff is improving is I can put my arm behind my back without too much pain. Couldn't do this since last July. It may be the benefit from a shot of cortisone that was also injected at the end of the lavage needling. Will have the shoulder area imaged in about 6 weeks time to determine if the lavage has succeeded.


Wednesday, May 2, 2018

print from a single plate that combines three techniques

https://www.etsy.com/ca/listing/612814647/small-landscape-combination-drypoint?ga_order=most_relevant&ga_search_type=handmade&ga_view_type=gallery&ga_search_query=&ref=sr_gallery-1-39


Back in October of last year I posted about a print I had made from using a single clear acrylic plate. 
http://myprintmakingjourney.blogspot.ca/2017/

This combined colour relief roll, monotype and drypoint. I had only made a couple of prints at that time. The plate was put into a safe place and I became involved with other projects   

Over the past couple of days I decided to return once again to printing a small edition off of this plate. I took photos during the process which I believe may explain better how I achieved each print on paper from the plate. I am hoping to print an additional 6 for a total of 20 over the next day or two. To date I have printed 13.

I am printing these using Caligo Safewash etching inks. The etching ink is also used for the relief/monotype stage.


Each print is made onto Somerset satin white rag. Using moisture activated butchers tape I affix each print onto a thin mdf panel where they are allowed to dry. The tape also keeps the slightly damp paper from buckling. 


The plexiglass (aka perspex) plate. Here the surface scratched line is revealed by applying and wiping black etching ink across the surface.


The plate showing colour relief roll of ink on the surface and the beginning stages of subtractive monotype. I create a colour blend for the blue on another larger piece of acrylic using a soft rubber brayer. I achieve this by applying prussian blue with a little white to establish the darkest hue at the top. I set a little white a couple of inches beside this and by rolling the ink with the brayer forward many times the two intermix until a nice blend from dark to light occurs. I then carefully transfer this from the roller onto the plate surface.
The light biege ink on the bottom foreground rock was applied with an even smaller width rubber brayer. This is achieved by first determining by eye where to start the brayer to meet at the line of blue and moving it across the surface to deposit the ink and not touch the wet blue ink. It requires a bit of skill and steady hand co-ordination.


Here you can see where I have removed ink using various tools (cotton swabs, rolled tissue, tip of a bamboo skewer) that will print as negative space.


Result of the printing of the colour relief roll and monotype for the first stage. 
The plate was set onto the press bed inked side facing upwards. I used a registration sheet underneath with markings made in light pencil to center the plate and also indicate where the corners of the paper should be. Soaked and blotted Somerset satin 250 gm rag was set over top. A piece of clean newsprint was set over the somerset and then the three wool felts were placed over all of this. The plate had a 45 degree bevel filed along the edges earlier. The pressure of the roller created an embossed mark around the print edges during printing. This will assist in positioning the plate a second time (ink side facing down) for the drypoint.


The colour ink residue was cleaned off the plate surface (using a rag and vegetable oil). I wiped carbon black etching ink into the recessed lines that were scratched on the plate earlier (the drypoint component). 
So now came the really tricky part. Carefully using a combination of steady hand and eye coordination I positioned the plate ink side facing down and set it over top of the colour print. The emboss from the bevel helped me to set it into place. 
I then set my clean hand over the plate. I placed my other hand underneath the paper and with a bit of slight pressure set it under the area where I had the plate pinned to the paper with the other hand on the opposite side. 
I slowly flipped it over so that the plate was underneath. I set this down on the press bed at a 45 degree angle and as the plate was lowered into a horizontal position I removed my hand slowly from underneath but made sure my hand over top of the paper and plate was pushing and making sure the plate wasn't slipping out of position underneath. I could tell once the paper was down flat as the raised shape of the plate from the previous printing held the plate in position. 
Clean newsprint was set over the back of the paper and once the felts were lowered. This time I set the hand that wasn't turning the press gears on top of the felts over the plate and paper area to hold in place until it was caught by the edge of the roller as the bed was moved under the roller.
When I lifted the paper after it had cleared the roller on the other side I saw that the drypoint element had printed nicely where it should be and the colour underprint was also in alignment.


Prints drying in a warm room. I use both sides of the boards to attach prints so angle them slightly out from the wall to allow for airflow on both sides during the drying process.